Friday, November 30, 2012

PIKE & SHOTTE AND BOLT ACTION

This week was the AGM at the SESWC so it was all business and no gaming.  However last week as well as the big Lutzen game I took part in 2 other games.  On Thursday at the SESWC I played Angus Konstam in a test of Pike and Shotte.  My Scottish Covenanting Army took on Angus’ Parliamentarians.  It did not go well for my side with my 3 regiments of horse proving to be cowardly knavish scoundrels and buffoons of the worst type.  There is a full account of this debacle on Angus’ Edinburgh Wargames blog.

http://www.edinburghwargames.com/Journal%2076.htm

As Angus wrote the rules worked smoothly.   I had produced a sheet listing the differences between Pike & Shotte and the much more familiar Black Powder, and this proved really useful in keeping us on track. I will add this as a page on the blog.  We will certainly try another P&S game soon.


Parliamentary foot firing at the Scots.......
On the Tuesday night I went to Colin Jack’s Wargames shed where we played a Bolt Action game with Dave O’Brien and Bill Millar who was up visiting from London.   In this late 1944 game Bill and I commanded a German force that was trying to break through a Free French force to reach a vital supply dump.  Both sides started with reconnaissance troops on the table and their engagement proved interesting as both sides made escape moves from the enemy fire.  Once each sides heavy equipment a Panzer IV, armoured infantry, M10 and M4 Shermans arrived things got more exciting.  We scored one major success  breaking the M10 with repeated hits from the armoured cars, panzerfausts and  the Panzer IV.  We had a Luftwaffe liaison officer who called up a rare air strike but the inexperienced pilot went astray and attacked our troops - knocking out one of our SD232 8 rads.

It was a good game.  I had ordered some customised game tokens from Warbases to use for Bolt Action games but they only arrived this week and so I will show them in my next Bolt Action report.


Luftwaffe succes - our 232 8 rad burning


Dave's French armour advancing

Sunday, November 25, 2012

LUTZEN 2 MAY 1813

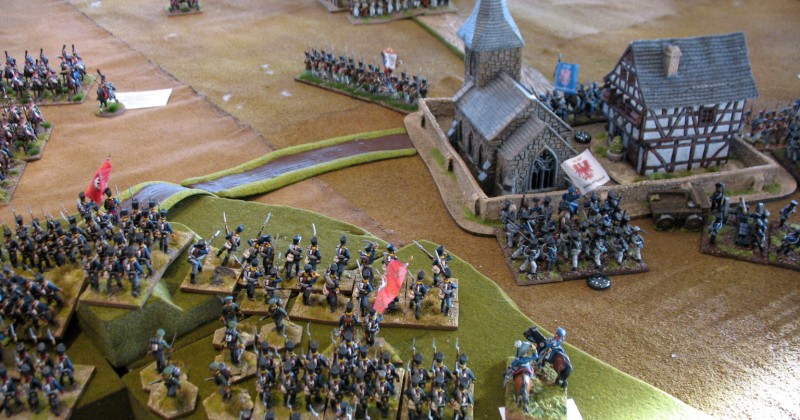
I was away on Saturday at the Manor House hotel at Lundin Links  in Fife for a large scale 28mm Napoleonic game.   It was played by 9 gamers from our AB1 group, largely members of the SESWC,  and was a refight of Lutzen 2 May 1813.  This time we decided to try to play our big game at Lundin Links in a single day rather than having a 2 day event.


The first Prussian attack on Gross Gorshen
The rules used were Black Powder with the revised  turn sequence. It was great fun with lots of troops but not to many to prevent some manoeuvring on the table.  We played the game from 10:00 AM to 4:30 PM with a 45 minute lunch break and a couple of coffee breaks.  In that time we played 10 turns  each one being 30 minutes of game time starting at 11:30 am and our last turn was the 4:00pm one.  The game was still in the balance at the end but is was certainly beginning to go the way of the French..


Russian cavalry charge disordered square of Marie Louises - who broke them
We fielded 112 infantry battalions, 33 cavalry regiments and 45 guns - an approximate total of 3,500 figures.  The French had a marked superiority in numbers of infantry with 14 more battalions whilst the allied Prussians and Russians had more than twice as many cavalry and 50% more guns.   The allies also had a marked qualitative advantage as 22 of the French battalions were low quality Marie Louises. The table we used was 16ft long by 10ft wide.

I have added a separate page to the blog with more information on the scenario with the OB, game rules, deployment limits and troop ratings etc.

More of my photos with descriptions at
http://www.flickr.com/photos/bill26048/sets/72157632100555740/

For a  full account of the how the game played with more photos see Angus Konstam’s excellent site at
http://www.edinburghwargames.com/


9th Division engages Yorck's Corps with Russian guard to left


French guard lancers attack Blucher's worn down command


Saturday, November 17, 2012

RUSSO-JAPANESE WAR 1905

This weeks game at the SESWC was a 28mm Russo-Japanese War game.  All the figures for this game were supplied by Colin Jack who also developed the scenario and acted as the umpire.  The game gave us a chance to try out Colin's expanding collection of Tsuba Miniatures Japanese infantry.


I commanded a Japanese force pursuing the retreating Russians.  Bart Zynda commanded the Russians as there may have been some Poles amongst them.  See the player briefing below.   We both split our forces to cross and cover the river at the 3 points A, B and C.  Bart and I then discovered that the table we were using only covered one of the these points and the battle would be fought where the most troops had been deployed.  It turned out to be at village C where I had deployed my weakest force of 2 trained battalions and the 2 units of Chinese auxiliary cavalry.  This meant that I was initially facing the strongest part of the Russian army.  The forces assigned to sectors A and B then appeared as reinforcements on the flank of the action.  Those in sector B could arrive in 1 to 6 moves those in sector A in 7 to 12 moves.


Chinese auxilaries lead the advance
Luckily for me the Russians were still marching back to the river and I managed to throw my 2 Chinese cavalry units over the narrow ford across the river followed by a trained infantry unit.  The cavalry delayed the Russian advance but both units were destroyed once they engaged in melee!   My infantry at the river came under heavy fire from the Russians who using their local numerical superiority had now occupied the village.  I reinforced them with the other trained unit.  My one piece of artillery arrived quickly from sector B and its accurate fire managed to break 2 of the raw Russian units on their right flank.  However both my units across the river were being worn down by surprisingly good Russian rifle fire and my first veteran infantry unit had only started to cross the ford when the game ended.


Skulking Cossacks......


Fatal charge into flank of the Cossacks....
So the end of the game saw the Japanese with a very tenuous bridgehead over the river held by the remnants of 2 trained infantry units.  If the Russians could launch an assault they would be able to drive us back across the river.

We used Triumph and Tragedy for this game.

An account from the Russian side is at Bart Zynda's blog at
http://asienieboje.blogspot.co.uk/2012/11/battle-of-ford-on-river-x-bitwa-o-brod.html/


End action situation - bridgehead under heavy fire...
JAPANESE PLAYER

Your march through Korea continues with the Russians steadily withdrawing before you.  You expect them to turn and make some kind of stand, perhaps at the River X.  You are maintaining contact with the retreating Russians using your Chinese auxiliary cavalry backed up by your own cavalry.
During the night, and a heavy rainstorm, contact has been lost but the advance continues.  On the basis of the following report from your cavalry commander you must decide how your advance should proceed.

"During the night, in low cloud and heavy rain, our scouts lost contact with the Russians. They are approaching the River X and there are three possible crossing points - a bridge at Village A and fords at Villages B and C.  It appears that the Russians may have crossed at all three points."

You have the following troops at your disposal:-
Infantry Battalion No 1    Veteran     10 rifles
Infantry Battalion No 2    Veteran     10 rifles
Infantry Battalion No 3    Veteran     10 rifles
Infantry Battalion No 4    Veteran     10 rifles
Infantry Battalion No 5    Trained     10 rifles
Infantry Battalion No 6    Trained     10 rifles
Infantry Battalion No 7    Trained     10 rifles
Cavalry Squadron No 1    Trained    5 sabres
Cavalry Squadron No 2    Trained    5 sabres
Chinese Auxiliaries A       Raw          5 sabres
Chinese Auxiliaries B       Raw          5 sabres
Artillery


RUSSIAN PLAYER

You have been steadily withdrawing before the inexorable Japanese advance.  Your Cossack cavalry provides the rearguard and maintains contact with the leading elements of the Japanese force.  Thanks to a heavy overnight rainstorm, contact now appears to have been lost.
Orders from Army HQ demand that you halt your withdrawal and attempt to hold the line of the River X which you crossed yesterday afternoon.  The Japanese have not reached the river but their axis of advance is unknown.
There are three crossing points, a bridge at Village A and fords at villages B and C.  You must decide how to deploy your troops to halt the Japanese advance.

You have the following troops at your disposal:-

Infantry Battalion No 1    Trained     10 rifles
Infantry Battalion No 2    Raw          10 rifles
Infantry Battalion No 3    Raw          10 rifles
Infantry Battalion No 4    Raw          10 rifles
Infantry Battalion No 5    Raw          10 rifles
Infantry Battalion No 6    Raw          10 rifles
Infantry Battalion No 7    Raw          10 rifles
Cossack Cavalry A          Raw+          6 sabres
Cossack Cavalry B          Raw+          6 sabres
Cossack Cavalry C          Raw+          6 sabres
Cossack Cavalry D          Raw+          6 sabres
Line Cavalry                    Trained         6 sabres
Artillery                           Trained

Sunday, November 11, 2012

TARGE 2012

This Saturday I went to the Kirriemuir Wargames Club's show Targe 2012.

Colin Jack put together a game from the Very British Conquest of Space with various alien factions attacking the 1950s Anglo-Canadian secret airfield/ rocket base at Fort Churchill with its underground laboratory. I supported Colin by running some of the games and during the day I think Colin and I each ran 4 fun games each. We used a slightly adapted version of the 7TV rules. The attacking and defending players both got to select their team from a variety of evil and good teams. I was pleased that our game won the trophy for best PP game.


SESWC - British Conquest of Space - A4(GB) prepares to launch
All my photos of the show at my flickr site below
http://www.flickr.com/photos/bill26048/sets/72157631983079129/

My highlights from the show were the the Iron Brigades Viking Saga game (which deservedly won best display), the Border Reivers Vietnam game, the League of Augsburg’s Nine Years War siege game set in Ireland and Dave Imrie’s fine Otterburn game. A few photos of these below……


Border Reveir's 28mm Vietnam War


The League of Augsburg - ficticious Irish Jacobite siege relief scenario set in 1690's


Dave Imrie's Battle of Otterburn


Iron Brigade - Viking saga
I got some good bargains at the Bring and Buy and stocked up on some necessities for the long winter months as Targe should be my last show of the year.
My thanks again to Dale Smith for all the effort he and his fellow club members put into it's organisation.

Link to the Targe website
http://www.kirriemuirwargames.co.uk/Targe.shtml

Sunday, November 4, 2012

DEATH IN AFRICA 1883 AND GANGSTERS

I managed to catch up with some gaming this week.   During our Thursday meeting at the SESWC club, we tried out the death in the Death in the Dark Continent set of rules by Chris Peers. The game was organised by Colin Jack, who umpired it, provided all the figures, terrain and the scenario. In this battle the Egyptians were commanded by myself and Angus Konstam, whilst the Mahdists were led by Donald Adamson, Campbell Hardie and Bart Zynda. The game was played along a 6ft by 8 ft table.


Madhists surge forward
The Egyptian objective was to advance down the table and capture the village of Ey Bai at the far end whilst the Madhists simply had to prevent this.  It quickly became apparent to Angus and I that this was beyond the ability of our force - our best armed troops were all raw - and we decided to form a firing line and hope that the Madhists would destroy themselves against it.

We only attacked on our right flank where Angus threw the Egyptian light horse against a unit of Ansar.  The cunning Madhists had deployed a unit of soldiers in a hidden position  at the side of the table and after defeating the Ansar our cavalry were surprised by the ambushers.  They attempted to ride round the Madhists lines to escape but were cut down by a unit of Beja.


Hicks pasha watching the steady Remington fire
In the centre our infantry did well initially destroying the Madhist cavalry and inflicting heavy casualties on the Ansar screening the advancing fanatical Beja units.  Things were going well until I decided to throw my Egyptian armoured cavalry into a Beja unit.  The cavalry broke in the melee and the resulting morale tests disrupted 3 of our 4 well armed infantry units.   The Beja saw their chance and charged 2 of our infantry units who firing widly into the air broke under the attack and fled the field.

Just before my fatal decision to charge with the heavy cavalry....
At that point with things looking very bad for the Egyptians we ended the game.  Death in the Dark Continent worked well and were fun. They are different from Chris Peer’s other more skirmish type rules - but still very simple - the actual rules are only 26 pages.  We will be trying them again.  I may even write a review.  Here are the orders of battle of the 2 sides.

EGYPTIANS
Hick Pasha, disciplined
Raw Soldiers with breechloaders (1)
Raw Soldiers with breechloaders (2)
Raw Soldiers with breechloaders (3)
Bazingers, untrained soldiers with muskets (1)
Bazingers, untrained soldiers with muskets (2)
Bashi Bazouks, untrained skirmishes with muskets
Mounted Bashi Bazouks, untrained light horse
Heavy cavalry
Medium rifled field gun

MAHDISTS
Uthman Digna, organised
Heavy Camelry
Jihadiya, soldiers with breechloaders
Jihadiya, elite soldiers with muskets, hidden
Beja, elite warriors (1)
Beja, elite warriors (2)
Beja, elite warriors (3)
Ansar, untrained skirmishes with muskets
Ansar, skirmishes with spears
Untrained light field gun
 
On Saturday I went to Hugh Wilsons for a big 1920s Gangster game.  Colin Jack worked out the scenarios and he and Hugh provided the figures and terrain.  Many thanks to Susanne Wilson for providing the US themed lunch.  


Hooverville.....
The rules we used were a modification of Legends of the West and came from an article in Wargames, Soldiers & Strategy.  There were 10 players at the game.  We played as 2 two man teams and 6 individuals in 2 mini leagues were we each played 3 games and then had a final round of games to decide the overall winner and loser.


Docklands before the bloodbath....
The long table was split into 4 districts each of which had a different scenario to play - the Docklands, Mainstreet USA, Hooverville and an aerodrome.   My gang got to the top final game after 3 fairly bloodless games.  In an exciting dockland shoot out with Dave O'Briens 18 strong Chinese tong - my guys were giving better than they took - nailing 9 of Daves for 5 losses on my side - until they headed for the hills or at least Brooklyn heights.


Aerodrome with impressive 1/48 diecast DC3
 Heroes armed with Tommy Guns and 38s are very effective.   No one made any use of vehicles and that is something we should look at in our next game.  There are a few minor things I would like to change in the rules to better suit gangsters but it all worked and it was great fun. 


Dave's chinese tong gang take cover from my shooting...

This coming week we are preparing our game for TARGE the Kirriemuir Wagames club show on Saturday the 10th.  So my next report will be all about TARGE 2012.


Thursday, October 25, 2012

BOLT ACTION AND NAPOLEONIC REINFORCEMENTS

I did not get to the SESWC last week as we were down in London visiting our daughter who has moved into a flat in Wimbledon. Having driven home yesterday I have now gone down with a bad cold and wont get to a game tonight either.

So this week I have added a review of the Bolt Action WWII rules from Warlord/Osprey as a page on the blog. This is a draft which I wrote for the review section of Angus Konstam’s Edinburgh Wargames page.

Once I can face the cold of my garage I will be working on retouching and rebasing 3 more regiments of Napoleonic cavalry which I have bought painted from South Africa on ebay. These will complete my 1812-14 French and Russian light cavalry commands.
Here is an update on some previously finished staff figures which I will use with my Napoleonic British army. I bought these nicely painted figures on ebay mounted on single bases and I have now rebased them in pairs as command vignettes. The 3mm thick MDF bases are from Warbases and the Silflor tufts were supplied by Mutineer Miniatures.


Wellington and staff

Lord Uxbridge and dragoon guard on foot
 
Stapleton-Cotton and ADC


Friday, October 12, 2012

HAIL CAESAR: The Crossings of Jordan

This week we had arranged our Hail Caesar Biblical game - Assyrians versus allied Israelites and Egyptians.  Donald Adamson came up with the scenario, orders of battle and umpired whilst  Hugh Wilson  provided the venue and terrain.  Suzanne Wilson provided the pre-game refreshments.


Assyrian army get to the Jordan...but does not cross
We used figures from various collections-  Dave provided the Assyrians, Donald the Israelites, Olivier and Hugh the Egyptians.  The figures were all based on Impetus bases or else were put onto Impetus sized sabot bases.  As in our last game we decided that a 12cm wide Impetus base was a standard sized Hail Caesar unit. 

Martin Gibson and Bart Zynda commanded the Israelites, Oliver, Hugh, Colin Jack and Kevan Gunn commanded the Egyptians whilst Dave O’Brien, Campbell Hardie and myself commanded the Assyrians.
How the game Played

Realising that we could not get much of the Assyrian army across the Jordan before the pursuing Israelites and Egyptians caught up with the rear of our widely spread out army we decided to turn and crush our pursuers.


My cavalry form up.. Ark of Covenant in cart in background
We formed with the infantry division commanded by Campbell in the centre, Dave took the heavy chariots and deployed them on our left and I commanded the cavalry on the right flank.  The allies massed the Israelites on their right flank with the Egyptians covering the centre and left.  Campbell did not have time to get his whole command deployed into a single group before it was engaged by the pursuing Egyptians.  Campbell managed to hold of the Egyptians and charged the my cavalry into their chariots.  I drove them back but I then blundered and 3 of my units fled to the rear facing away from the enemy.  The Egyptians pursued with their best remaining chariot unit but my disordered cavalry who had not fled defeated them in melee so saving their more craven comrades.

On our left flank Daves heavy chariots rumbled into the Israelites driving back their front line of infantry and pushing back the troops deployed behind them.  Another move of melees drove the back rank of the Israelites of the table.  At that point ended.  We had broken 2 of the enemy divisions but had not won enough of a victory -  to recover from not getting the Ark of the Covenant of the table.

Egyptians attack infantry division.....
General Briefing
As the Assyrian Empire extends, in the west it begins to rub against the Egyptians, and in particular, their satellite nation: Israel.
The King of Assyria, Da Obron, leads a surprise attack into Israel, and pillages Jerusalem. He retires towards Nineveh with his spoils, including a wooden chest, which may contain the Ark of the Covenant.
Just west of the River Jordan, the Assyrian rearguard spies two clouds of dust emerging from the west. In quick order one resolves itself into the Egyptians led by the famous General of the Pharoahs, Olle Re  The other appears to be led by the Chief Priest of the Temple of Solomon, Colleviticus.
The Assyrians begin the game in a double width column along the road, with its head having just reached the ford. The ford is two units wide.
The game is won by the Assyrians if they can get the wagon train with the Ark of the Covenant off the east end of the table.
There are decisions to be taken.  Players refer to individual briefings on the night.

Infantry division commander inspires his troops......

Assyrian Briefing and OB
You begin the game in a column on the road to the ford. The head of your column has reached the ford, which can be crossed at half pace. It is only one unit wide.
You have a report from a spy that the Egyptians have a force east of the River Jordan. Where it is, or the size of it, is uncertain.

Assyrian Army: 3 divisions
DIV 1  5 Heavy Chariots. Division breaks on loss of 3 chariots
DIV 2  5 Units of Cavalry. Division breaks on loss of 3 units
DIV 3  4 units of spear and bow armed infantry; 2 units of bow and sling armed infantry; 2 units of spear and bow armed light infantry; 1 unit of Elamites; 3 units of bow armed skirmishers; 1 unit of javelin armed skirmishers. Division breaks on the loss of 5 non skirmish units.
Did I also mention that you can also win by routing both the enemy forces (Egyptians and Israelites fight as separate armies), as well as getting the Ark of the Covenant off the board?

Egyptian/Israelite Briefing and OB
The Israelite player gets to roll a dice every turn. On a six, the Ark of the Covenant explodes onto light (you have seen the films) and kills all the Assyrian drivers of the wagon train. The wagon train can only be re-crewed by a unit touching the wagon train, and moving off again next move.
If adjacent to the River Jordan at any point, The Israelite can pray for a crossing, which succeeds on a 6, then a 5 or 6 in the second turn and so on, getting progressively easier. Only Israelite forces can use this crossing. It is one unit wide, and crossed at half pace.
The subsidiary Egyptian force can appear anywhere east of the River Jordan, on the northern edge of the board, but not closer than 30 inches from an Assyrian unit, and only after the Wagon Train is 24 inches east of the ford on the road.

Egyptian Main Force: 3 divisions
DIV 1  4 Chariots; 4 chariot runners. Break on 3 or more losses of chariots
DIV 2  2 Egyptian spearmen; 1 Kushite; 3 bow armed skirmishers. Break on loss of 2 or more non skirmishers
DIV 3  2 Egyptian Axemen; 1 Sherden Guard; 3 bow armed skirmishers. Break on loss of two or more non skirmishers
Israelites: 3 Divisions
DIV 1  4 chariots; 4 chariot cavalry out-riders. Break on 3 or more chariots lost.
DIV 2  3 Judean spearmen; 2 bow armed skirmishers; 1 javelin armed skirmishers. Break on loss of 2 or more non skirmishers.
DIV 3 3 Judean spearmen; 2 javelin armed skirmish infantry ; 1 bow armed skirmish unit. Break on 2 or more non skirmishers
Egyptian flank force
DIV 4  2 chariots; 6 Egyptian spearmen. Beak on the loss of 5 units