Monday, December 24, 2012

MERRY XMAS 2012

It has been a good year of wargaming here with many memorable games and some major projects completed.   Thank you all for the feedback and comments.


CATZILLA bestrides an AWI battlefield

This photo is our cat Margot inspiring the British counterattack at Germantown. Does her serious look give them a terrifying charge on the Patriots?  Probably not as she is well behaved and so far has not eaten any of  the troops of either side. 

I hope to play Germantown again early in the New Year if Margot has not eaten the scenery.

Why the name Margot? My wife read Alexander Dumas’ historical novel La Reine Margot as a girl and decided on that name rather than her official cat council name of Ratho Rags Bambi.

Saturday, December 22, 2012

28mm BOLT ACTION - ARDENNES 1940

This Thursday we played a game at Hugh Wilson‘s house using the Bolt Action rules. The scenario was set in the Ardennes in 1940. It was a debut for the French early war collection of Campbell Hardie. The rest of the figures and the scenario were provided by Colin Jack. Hugh provided all the terrain on the 12ft by 5 ft table.

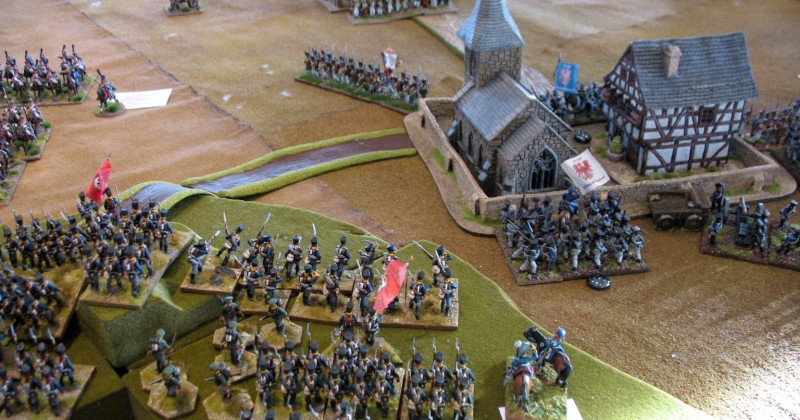
German advance guard stopped at the first roadblock
In this game, the Germans (elements of Rommel’s 7th Panzer Division - played by Martin Gibson, Donald Adamson and Hugh) had to break through the winding and narrow roads in the Ardennes in order to encircle the Allied armies in Belgium. Defending the main road were the Belgians (myself and Bart Zynda), who were to be supported by advancing French motorised forces (Colin and Campbell). The Belgians decided to at any cost to delay the Germans march along the road, so they left some barricades on the road at the resistance points, to delay the German armour, and to give the French more time for the arrival of their forces.
French S35s move forward
The Belgians showed exceptional courage, but their blocking forces were successively eliminated by the stronger and far better armed Germans. This heroic Belgian sacrifice gave the French time to arrive and join the main Belgian defence line and effectively stop the German advance. We used the draft Warlord 1940 French Army list. The rules in this force the French tanks to order any advance move and this proved problematic, worsened by the effects of a German air strike which scored multiple pins on both the S35s. The main allied line was still holding at the end of the game but by then French armour only seemed capable of going backwards.
HS123 attacks the French armour
FRENCH BRIEFING

You command a small task force which has been sent into the Ardennes to assist the local Belgian troops in resisting the advance of the Germans. While it might be acceptable for your force to die to the last Belgian we simply cannot leave the defence of the Ardennes to them. You should try to avoid upsetting the locals who will no doubt believe that they have the situation under control. Press forward to the most advanced road block and try to assume command or
at least influence the tactical troop deployment. At your disposal you have the following:-

Force HQ Officer, SMG, 2 rifles, medic, Regular
Char B1 tank Medium (9+), light AT gun, light howitzer, MMG, Inexperienced
Somua S35 tank Medium (9+), medium AT gun, MMG, Inexperienced
Infantry section Officer + 10 rifles, inc LMG, Regular }
Infantry section Officer + 10 rifles, inc LMG, Regular } motorised
Infantry section Officer + 10 rifles, inc LMG, Regular }
75mm gun + tow 3 crew; light howitzer, Regular
25mm AT + tow 3 crew; light AT gun, Regular


Must attempt to reach the front, at least with the armour.
Roadblocks must be dismantled to allow passage and this may have to be done by your infantry if Belgians refuse.
Belgian troops are unlikely to take any orders from you.

BELGIAN BRIEFING

You command a small force which has been given the task of preventing the German invaders moving up the through the forest road towards the French frontier. You have constructed roadblocks and sited anti-tank guns but you have very few troops to cover the whole area. The French have announced that support is on its way which might be helpful except for the fact that they will want to take control of operations. This you should resist while accepting what assistance seems appropriate. At your disposal you have the following:-

Force HQ Officer, 2 rifles, light AT gun with 3 crew
Infantry section Officer + 7 rifles + LMG + ATR Veteran
Infantry section Officer + 8 rifles + LMG Regular
Infantry section Officer + 6 rifles + LMG Inexperienced
HMG section 3 crew Regular
Mortar Section 3 crew Veteran
AT Gun section 3 crew Veteran
AT Gun section 3 crew Regular
T15 tank Light tank; light autocannon Regular

May set up 3 roadblocks marked on map. Invisible until direct LOS established.
Each roadblock guarded by an infantry section.
AT guns may be set up anywhere and will also be invisible. Hard Cover.
Tank may be concealed or even dug in.
French will arrive behind the roadblocks and will insist on dismantling them to allow their own troops to reach the front. Belgians will have to rebuild.
Dismantling/Re-building takes inf section 1 turn
Belgians have option of refusing to co-operate.

GERMAN BRIEFING

You have an armoured column with motorised support which is ordered to head through the Ardennes Forest via route N37 and break through towards the French frontier. The terrain lends itself to ambush but the Belgians will have little in the way of AT weapons and even less in the way of armour. The French may attempt to give support but a quick thrust should see you at the border before they are able to react. You have the following troops at your disposal:-

Commander A/C Armoured Car (7+); open top Regular Recce
Sdkfz 222 Armoured Car (7+); light autocannon, Regular Recce
Pz38t Light tank (8+); light AT gun; MMG, Regular
PzIV short Medium tank (9+); medium AT gun; MMG, Regular
Infantry HQ Officer, 2 smg, 2 rifles, medic Regular, Kubelwagen
Infantry section Officer, 2 smg, 8 rifles, 1lmg, Regular, Hanomag
Engineer section Officer + 11 rifles Veteran, Hanomag
Luftwaffe liaison Officer, radio op. Regular, VW Van

You can reinforce with
Infantry HQ Officer, 2 smg, 2 rifles, medic Regular, Kubelwagen
Infantry section Officer, 2 smg, 8 rifles, 1lmg, Regular, Truck
PzIV short Medium tank (9+); medium AT gun; MMG, Regular
PzII Light tank (8+); light autocannon, MMG, Regular
 
Your advance up the valley is certain to be hindered by roadblocks and ambushes.
Roadblocks will not be seen until LOS is established.
KO'd vehicles will block road but can be pushed off in one turn by heavier vehicle, doing nothing else, or in two turns by equal vehicle.
Engineer section can open roadblock in one turn, normal infantry in two turns.
You have a Luftwaffe liaison team who may be able to call in an air strike. The pilot will only be able to see troops/vehicles on the road.

Saturday, December 15, 2012

AWI GERMANTOWN OCTOBER 1777

This Saturday I staged a large scale 28mm AWI game. It was played by 4 gamers from Westlothian at my house and was a refight of the Battle of Germantown 4th October 1777.

The rules used were Black Powder with the revised turn sequence.  We fielded an approximate total of  750 figures.  The table was 12ft long by 6ft wide.  It proved to be good fun game for everyone despite my often very bad dice rolling.


View at start from east end of the table
I have added a separate page to the blog with all the scenario information - background, OB, deployment limits, game rules incl fog rules and troop ratings etc. 

More photos and descriptions at
http://www.flickr.com/photos/bill26048/sets/72157632251231789/

The British had 3 infantry brigades deployed on the table at the beginning of the game.  Of these the Piquet brigade was formed up with the 40th Foot occupying the formidable mansion of Cliveden.  The other 2 brigades were encamped in Germantown and these units had to be woken and ordered to form up individually.  They had a further 2 infantry brigades and a small cavalry brigade in distant reserve of table to the south.  The Patriots started with elements of 2 large Continental brigades on table with the rest of these brigades attempting to march on from in turn 1.  They had a central reserve of  table of a Continental brigade and a small cavalry brigade plus a militia brigade on each flank attempting a wide turning double envelopment.


The assualt on Cliveden - heavy fire...
The Patriots made their main effort at Cliveden supported by a turning movement by Greene’s brigade on their left flank which eventually threatened the eastern outskirts of Germantown.  Cliveden counted as a BUA under Black powder and was held by crack British line infantry.   So I was confident my British would hold - as anything but a 1 is a save in the morale rolls.  Well it fell to concerted volleys and a follow up bayonet attack by 3 Continental regiments as I threw 5 ones out of 11 hand to hand morale saves and my unit then broke.


British right wing driven back to edge of town
It was not until Cliveden fell that the 2 British brigades in Germanton were fully formed up and moved the relieve the garrison.  The right flank brigade then withdrew to the edge of the town due to the threat from Greene’s Continentals.  The left flank brigade secured their edge of the town and began a cautious advance on the Patriots west of Cliveden  which developed into a full scale counterattack when the British reserve brigade under Cornwallis arrived.  The patriots held the attack of the British and Hessian grenadiers but the British guards broke their opponents.   However at the end of the game Cliveden was still securely in Patriot hands.   One of Greene’s Continental units flank attacked a British line unit but those heroes held the attack, turned disordered and after a further 2 rounds of combat broke the Continentals.


The British counterattack west of Cliveden
On the British left flank the Hessian brigade arrived after a full and lengthy breakfast and engaged and were driving back the long delayed flanking militia brigade who were being supported by the Continental reserves.
Given that Cliveden was securely held by the Patriots at the end of the game and that the losses were roughly equal on both sides we declared the game a marginal win for the Patriots.

Friday, December 7, 2012

MUSKETS AND TOMAHAWKS

This week I arranged an AWI game of Muskets and Tomahawks at Hugh Wilson’s house.


The game was very vaguely based on the Wyoming Valley Massacre in 1777 in that I used the names of 2 of the forts in the Wyoming Valley.  It was a raid by a British force of Tories, Hessians and Indian allies opposed by Patriot civilians, militia and Continentals.  Hugh provided the terrain on the 12 ft by 5 ft table and most of the buildings, I provided the fort and the majority of the figures with Dave O’Brien providing the Indian allies and civilian settlers.


Peaceful scene - settlement A to the right and B to the left
Colin Jack, Tim Watson, Donald Adamson and Hugh Wilson played the patriots each having a mixture of units.  On the British side Bart Zynda commanded the Hessians, Angus Konstam the Tories, Cameron Hardie the irregulars (rangers, jaegers and lights)  and Dave O’Brien the Indian allies.  I umpired the game and kept it moving along.  Only 3 of the players had tried the Muskets and Tomahawks rules previously.

The superior British force deployed the Indians and the Irregulars on their left flank and they quickly overran the nearest settlement A routing 2 units of militia.  They then engaged Patriot reinforcements of a unit of mounted rifles and continentals which had moved to protect the next settlement B.   The Indians took the lead in the action and by the end of the game they had broken both the Patriot units and overrun the settlement.


Red War  - British led hordes overrun settlement A


Indians engage counterattacking  militia
On their right flank the British started with their Tories on the table who commanded by Angus moved to attack settlement C on the way to the fort.  Bart brought the Hessians onto the table by boat and after landing they moved thru the woods to attack the fort which had been reinforced by 2 units of militia. The Tories then used these boats to cross the river to attack settement D near the fort.  In the last turn the 2 Hessian units which had finally emerged from the woods fired and both inflicted 7 hits on the militia units and broke them.


Tories use the Hessian boats as a bridge
Our conclusion was that Muskets and Tomahawks worked well, I like the card system with the varying numbers of actions for different unit types.  However firing can very deadly - as shown by the Hessians.  We had provided numbers of boats, canoes and bateaux which could be used both sides on the extensive river network but disappointingly only Bart used them.

I had problems with my photos but there are more photos on Bart's flickr site at
http://www.flickr.com/photos/asienieboje/sets/72157632195940145/

Here are the player briefings and orders of battle for both sides.

BRITISH BRIEFING
You are in command of force of Loyalists supported by regular Hessians and numerous Iroquois which is moving along the Susquehanna River to attack settlements in the Wyoming Valley.  You know from your scouts that there are 6 civilian settlements in the district along with a small military garrison at Fort Wintermoot.  The main concentration point of Patriot troops and militia may be near to Forty Fort which is a few miles from this district.  9 of your 17 listed units are at hand when the action begins and can be deployed at your edge of the table. All your other troops are marching to the area and will arrive as reinforcements. Some could arrive on boats.

BRITISH OB
REG 2 BRITISH OFFICERS                28 Pts  56
PROV12 TORIES (Auxiliaries), Msk       5 Pts ea 60
PROV 12 TORIES (Auxiliaries), Msk      5 Pts ea 60

IRR 6 RANGERS, Msk, Tmk                  9 Pts ea 54
IRR 6 HESSIAN JAEGERS, Rfl            14 Pts ea 84
IRR 6 BRUNSWICK JAEGERS, Rfl     14 Pts ea 84
IRR 8 LIGHT INFANTRY, Msk            10 Pts ea 80

REG GERMAN OFFICER                    28 Pts  28
REG 12 HESSIAN INFANTRY, Msk    7 Pts ea 84

6 INDIAN ALLIES (Auxiliaries), Msk, Tmk  8 Pts ea 48

PATRIOT BRIEFING
You are responsible for the defence of the Wyoming Valley.  There are 6 civilian settlements in the district along with the military garrison at Fort Wintermoot.  It has been reported that a force of Loyalists supported by regular Hessians and numerous Iroquois are moving along the Susquehanna River to attack the valley.  Immediately to hand to defend the settlements are a continental unit garrisoning the fort, 3 units of militia, and a unit of riflemen.  These can be deployed around the settlements.  All your other troops are marching to the area from Forty Fort and will arrive as reinforcements.  Some could arrive by boat.

PATRIOT OB
REG CONTINENTAL OFFICER      28 Pts  28
REG 12 CONTINENTALS, Msk        8 Pts ea 96

MIL 12  MILITIA (Auxiliaries),  Msk    3 Pts ea 36

IRR PATRIOT OFFICER                 28 Pts  28
IRR 6 RIFLEMEN, Rifle                    8 Pts ea 48
IRR 6 RIFLEMEN, Rifle                    8 Pts ea 48
IRR 6 MTD RIFLES, Rifle, Horse    11 Pts ea 66

CIV 5 CIVILIANS as equipped     2Pts ea 10

Friday, November 30, 2012

PIKE & SHOTTE AND BOLT ACTION

This week was the AGM at the SESWC so it was all business and no gaming.  However last week as well as the big Lutzen game I took part in 2 other games.  On Thursday at the SESWC I played Angus Konstam in a test of Pike and Shotte.  My Scottish Covenanting Army took on Angus’ Parliamentarians.  It did not go well for my side with my 3 regiments of horse proving to be cowardly knavish scoundrels and buffoons of the worst type.  There is a full account of this debacle on Angus’ Edinburgh Wargames blog.

http://www.edinburghwargames.com/Journal%2076.htm

As Angus wrote the rules worked smoothly.   I had produced a sheet listing the differences between Pike & Shotte and the much more familiar Black Powder, and this proved really useful in keeping us on track. I will add this as a page on the blog.  We will certainly try another P&S game soon.


Parliamentary foot firing at the Scots.......
On the Tuesday night I went to Colin Jack’s Wargames shed where we played a Bolt Action game with Dave O’Brien and Bill Millar who was up visiting from London.   In this late 1944 game Bill and I commanded a German force that was trying to break through a Free French force to reach a vital supply dump.  Both sides started with reconnaissance troops on the table and their engagement proved interesting as both sides made escape moves from the enemy fire.  Once each sides heavy equipment a Panzer IV, armoured infantry, M10 and M4 Shermans arrived things got more exciting.  We scored one major success  breaking the M10 with repeated hits from the armoured cars, panzerfausts and  the Panzer IV.  We had a Luftwaffe liaison officer who called up a rare air strike but the inexperienced pilot went astray and attacked our troops - knocking out one of our SD232 8 rads.

It was a good game.  I had ordered some customised game tokens from Warbases to use for Bolt Action games but they only arrived this week and so I will show them in my next Bolt Action report.


Luftwaffe succes - our 232 8 rad burning


Dave's French armour advancing

Sunday, November 25, 2012

LUTZEN 2 MAY 1813

I was away on Saturday at the Manor House hotel at Lundin Links  in Fife for a large scale 28mm Napoleonic game.   It was played by 9 gamers from our AB1 group, largely members of the SESWC,  and was a refight of Lutzen 2 May 1813.  This time we decided to try to play our big game at Lundin Links in a single day rather than having a 2 day event.


The first Prussian attack on Gross Gorshen
The rules used were Black Powder with the revised  turn sequence. It was great fun with lots of troops but not to many to prevent some manoeuvring on the table.  We played the game from 10:00 AM to 4:30 PM with a 45 minute lunch break and a couple of coffee breaks.  In that time we played 10 turns  each one being 30 minutes of game time starting at 11:30 am and our last turn was the 4:00pm one.  The game was still in the balance at the end but is was certainly beginning to go the way of the French..


Russian cavalry charge disordered square of Marie Louises - who broke them
We fielded 112 infantry battalions, 33 cavalry regiments and 45 guns - an approximate total of 3,500 figures.  The French had a marked superiority in numbers of infantry with 14 more battalions whilst the allied Prussians and Russians had more than twice as many cavalry and 50% more guns.   The allies also had a marked qualitative advantage as 22 of the French battalions were low quality Marie Louises. The table we used was 16ft long by 10ft wide.

I have added a separate page to the blog with more information on the scenario with the OB, game rules, deployment limits and troop ratings etc.

More of my photos with descriptions at
http://www.flickr.com/photos/bill26048/sets/72157632100555740/

For a  full account of the how the game played with more photos see Angus Konstam’s excellent site at
http://www.edinburghwargames.com/


9th Division engages Yorck's Corps with Russian guard to left


French guard lancers attack Blucher's worn down command


Saturday, November 17, 2012

RUSSO-JAPANESE WAR 1905

This weeks game at the SESWC was a 28mm Russo-Japanese War game.  All the figures for this game were supplied by Colin Jack who also developed the scenario and acted as the umpire.  The game gave us a chance to try out Colin's expanding collection of Tsuba Miniatures Japanese infantry.


I commanded a Japanese force pursuing the retreating Russians.  Bart Zynda commanded the Russians as there may have been some Poles amongst them.  See the player briefing below.   We both split our forces to cross and cover the river at the 3 points A, B and C.  Bart and I then discovered that the table we were using only covered one of the these points and the battle would be fought where the most troops had been deployed.  It turned out to be at village C where I had deployed my weakest force of 2 trained battalions and the 2 units of Chinese auxiliary cavalry.  This meant that I was initially facing the strongest part of the Russian army.  The forces assigned to sectors A and B then appeared as reinforcements on the flank of the action.  Those in sector B could arrive in 1 to 6 moves those in sector A in 7 to 12 moves.


Chinese auxilaries lead the advance
Luckily for me the Russians were still marching back to the river and I managed to throw my 2 Chinese cavalry units over the narrow ford across the river followed by a trained infantry unit.  The cavalry delayed the Russian advance but both units were destroyed once they engaged in melee!   My infantry at the river came under heavy fire from the Russians who using their local numerical superiority had now occupied the village.  I reinforced them with the other trained unit.  My one piece of artillery arrived quickly from sector B and its accurate fire managed to break 2 of the raw Russian units on their right flank.  However both my units across the river were being worn down by surprisingly good Russian rifle fire and my first veteran infantry unit had only started to cross the ford when the game ended.


Skulking Cossacks......


Fatal charge into flank of the Cossacks....
So the end of the game saw the Japanese with a very tenuous bridgehead over the river held by the remnants of 2 trained infantry units.  If the Russians could launch an assault they would be able to drive us back across the river.

We used Triumph and Tragedy for this game.

An account from the Russian side is at Bart Zynda's blog at
http://asienieboje.blogspot.co.uk/2012/11/battle-of-ford-on-river-x-bitwa-o-brod.html/


End action situation - bridgehead under heavy fire...
JAPANESE PLAYER

Your march through Korea continues with the Russians steadily withdrawing before you.  You expect them to turn and make some kind of stand, perhaps at the River X.  You are maintaining contact with the retreating Russians using your Chinese auxiliary cavalry backed up by your own cavalry.
During the night, and a heavy rainstorm, contact has been lost but the advance continues.  On the basis of the following report from your cavalry commander you must decide how your advance should proceed.

"During the night, in low cloud and heavy rain, our scouts lost contact with the Russians. They are approaching the River X and there are three possible crossing points - a bridge at Village A and fords at Villages B and C.  It appears that the Russians may have crossed at all three points."

You have the following troops at your disposal:-
Infantry Battalion No 1    Veteran     10 rifles
Infantry Battalion No 2    Veteran     10 rifles
Infantry Battalion No 3    Veteran     10 rifles
Infantry Battalion No 4    Veteran     10 rifles
Infantry Battalion No 5    Trained     10 rifles
Infantry Battalion No 6    Trained     10 rifles
Infantry Battalion No 7    Trained     10 rifles
Cavalry Squadron No 1    Trained    5 sabres
Cavalry Squadron No 2    Trained    5 sabres
Chinese Auxiliaries A       Raw          5 sabres
Chinese Auxiliaries B       Raw          5 sabres
Artillery


RUSSIAN PLAYER

You have been steadily withdrawing before the inexorable Japanese advance.  Your Cossack cavalry provides the rearguard and maintains contact with the leading elements of the Japanese force.  Thanks to a heavy overnight rainstorm, contact now appears to have been lost.
Orders from Army HQ demand that you halt your withdrawal and attempt to hold the line of the River X which you crossed yesterday afternoon.  The Japanese have not reached the river but their axis of advance is unknown.
There are three crossing points, a bridge at Village A and fords at villages B and C.  You must decide how to deploy your troops to halt the Japanese advance.

You have the following troops at your disposal:-

Infantry Battalion No 1    Trained     10 rifles
Infantry Battalion No 2    Raw          10 rifles
Infantry Battalion No 3    Raw          10 rifles
Infantry Battalion No 4    Raw          10 rifles
Infantry Battalion No 5    Raw          10 rifles
Infantry Battalion No 6    Raw          10 rifles
Infantry Battalion No 7    Raw          10 rifles
Cossack Cavalry A          Raw+          6 sabres
Cossack Cavalry B          Raw+          6 sabres
Cossack Cavalry C          Raw+          6 sabres
Cossack Cavalry D          Raw+          6 sabres
Line Cavalry                    Trained         6 sabres
Artillery                           Trained

Sunday, November 11, 2012

TARGE 2012

This Saturday I went to the Kirriemuir Wargames Club's show Targe 2012.

Colin Jack put together a game from the Very British Conquest of Space with various alien factions attacking the 1950s Anglo-Canadian secret airfield/ rocket base at Fort Churchill with its underground laboratory. I supported Colin by running some of the games and during the day I think Colin and I each ran 4 fun games each. We used a slightly adapted version of the 7TV rules. The attacking and defending players both got to select their team from a variety of evil and good teams. I was pleased that our game won the trophy for best PP game.


SESWC - British Conquest of Space - A4(GB) prepares to launch
All my photos of the show at my flickr site below
http://www.flickr.com/photos/bill26048/sets/72157631983079129/

My highlights from the show were the the Iron Brigades Viking Saga game (which deservedly won best display), the Border Reivers Vietnam game, the League of Augsburg’s Nine Years War siege game set in Ireland and Dave Imrie’s fine Otterburn game. A few photos of these below……


Border Reveir's 28mm Vietnam War


The League of Augsburg - ficticious Irish Jacobite siege relief scenario set in 1690's


Dave Imrie's Battle of Otterburn


Iron Brigade - Viking saga
I got some good bargains at the Bring and Buy and stocked up on some necessities for the long winter months as Targe should be my last show of the year.
My thanks again to Dale Smith for all the effort he and his fellow club members put into it's organisation.

Link to the Targe website
http://www.kirriemuirwargames.co.uk/Targe.shtml

Sunday, November 4, 2012

DEATH IN AFRICA 1883 AND GANGSTERS

I managed to catch up with some gaming this week.   During our Thursday meeting at the SESWC club, we tried out the death in the Death in the Dark Continent set of rules by Chris Peers. The game was organised by Colin Jack, who umpired it, provided all the figures, terrain and the scenario. In this battle the Egyptians were commanded by myself and Angus Konstam, whilst the Mahdists were led by Donald Adamson, Campbell Hardie and Bart Zynda. The game was played along a 6ft by 8 ft table.


Madhists surge forward
The Egyptian objective was to advance down the table and capture the village of Ey Bai at the far end whilst the Madhists simply had to prevent this.  It quickly became apparent to Angus and I that this was beyond the ability of our force - our best armed troops were all raw - and we decided to form a firing line and hope that the Madhists would destroy themselves against it.

We only attacked on our right flank where Angus threw the Egyptian light horse against a unit of Ansar.  The cunning Madhists had deployed a unit of soldiers in a hidden position  at the side of the table and after defeating the Ansar our cavalry were surprised by the ambushers.  They attempted to ride round the Madhists lines to escape but were cut down by a unit of Beja.


Hicks pasha watching the steady Remington fire
In the centre our infantry did well initially destroying the Madhist cavalry and inflicting heavy casualties on the Ansar screening the advancing fanatical Beja units.  Things were going well until I decided to throw my Egyptian armoured cavalry into a Beja unit.  The cavalry broke in the melee and the resulting morale tests disrupted 3 of our 4 well armed infantry units.   The Beja saw their chance and charged 2 of our infantry units who firing widly into the air broke under the attack and fled the field.

Just before my fatal decision to charge with the heavy cavalry....
At that point with things looking very bad for the Egyptians we ended the game.  Death in the Dark Continent worked well and were fun. They are different from Chris Peer’s other more skirmish type rules - but still very simple - the actual rules are only 26 pages.  We will be trying them again.  I may even write a review.  Here are the orders of battle of the 2 sides.

EGYPTIANS
Hick Pasha, disciplined
Raw Soldiers with breechloaders (1)
Raw Soldiers with breechloaders (2)
Raw Soldiers with breechloaders (3)
Bazingers, untrained soldiers with muskets (1)
Bazingers, untrained soldiers with muskets (2)
Bashi Bazouks, untrained skirmishes with muskets
Mounted Bashi Bazouks, untrained light horse
Heavy cavalry
Medium rifled field gun

MAHDISTS
Uthman Digna, organised
Heavy Camelry
Jihadiya, soldiers with breechloaders
Jihadiya, elite soldiers with muskets, hidden
Beja, elite warriors (1)
Beja, elite warriors (2)
Beja, elite warriors (3)
Ansar, untrained skirmishes with muskets
Ansar, skirmishes with spears
Untrained light field gun
 
On Saturday I went to Hugh Wilsons for a big 1920s Gangster game.  Colin Jack worked out the scenarios and he and Hugh provided the figures and terrain.  Many thanks to Susanne Wilson for providing the US themed lunch.  


Hooverville.....
The rules we used were a modification of Legends of the West and came from an article in Wargames, Soldiers & Strategy.  There were 10 players at the game.  We played as 2 two man teams and 6 individuals in 2 mini leagues were we each played 3 games and then had a final round of games to decide the overall winner and loser.


Docklands before the bloodbath....
The long table was split into 4 districts each of which had a different scenario to play - the Docklands, Mainstreet USA, Hooverville and an aerodrome.   My gang got to the top final game after 3 fairly bloodless games.  In an exciting dockland shoot out with Dave O'Briens 18 strong Chinese tong - my guys were giving better than they took - nailing 9 of Daves for 5 losses on my side - until they headed for the hills or at least Brooklyn heights.


Aerodrome with impressive 1/48 diecast DC3
 Heroes armed with Tommy Guns and 38s are very effective.   No one made any use of vehicles and that is something we should look at in our next game.  There are a few minor things I would like to change in the rules to better suit gangsters but it all worked and it was great fun. 


Dave's chinese tong gang take cover from my shooting...

This coming week we are preparing our game for TARGE the Kirriemuir Wagames club show on Saturday the 10th.  So my next report will be all about TARGE 2012.


Thursday, October 25, 2012

BOLT ACTION AND NAPOLEONIC REINFORCEMENTS

I did not get to the SESWC last week as we were down in London visiting our daughter who has moved into a flat in Wimbledon. Having driven home yesterday I have now gone down with a bad cold and wont get to a game tonight either.

So this week I have added a review of the Bolt Action WWII rules from Warlord/Osprey as a page on the blog. This is a draft which I wrote for the review section of Angus Konstam’s Edinburgh Wargames page.

Once I can face the cold of my garage I will be working on retouching and rebasing 3 more regiments of Napoleonic cavalry which I have bought painted from South Africa on ebay. These will complete my 1812-14 French and Russian light cavalry commands.
Here is an update on some previously finished staff figures which I will use with my Napoleonic British army. I bought these nicely painted figures on ebay mounted on single bases and I have now rebased them in pairs as command vignettes. The 3mm thick MDF bases are from Warbases and the Silflor tufts were supplied by Mutineer Miniatures.


Wellington and staff

Lord Uxbridge and dragoon guard on foot
 
Stapleton-Cotton and ADC


Friday, October 12, 2012

HAIL CAESAR: The Crossings of Jordan

This week we had arranged our Hail Caesar Biblical game - Assyrians versus allied Israelites and Egyptians.  Donald Adamson came up with the scenario, orders of battle and umpired whilst  Hugh Wilson  provided the venue and terrain.  Suzanne Wilson provided the pre-game refreshments.


Assyrian army get to the Jordan...but does not cross
We used figures from various collections-  Dave provided the Assyrians, Donald the Israelites, Olivier and Hugh the Egyptians.  The figures were all based on Impetus bases or else were put onto Impetus sized sabot bases.  As in our last game we decided that a 12cm wide Impetus base was a standard sized Hail Caesar unit. 

Martin Gibson and Bart Zynda commanded the Israelites, Oliver, Hugh, Colin Jack and Kevan Gunn commanded the Egyptians whilst Dave O’Brien, Campbell Hardie and myself commanded the Assyrians.
How the game Played

Realising that we could not get much of the Assyrian army across the Jordan before the pursuing Israelites and Egyptians caught up with the rear of our widely spread out army we decided to turn and crush our pursuers.


My cavalry form up.. Ark of Covenant in cart in background
We formed with the infantry division commanded by Campbell in the centre, Dave took the heavy chariots and deployed them on our left and I commanded the cavalry on the right flank.  The allies massed the Israelites on their right flank with the Egyptians covering the centre and left.  Campbell did not have time to get his whole command deployed into a single group before it was engaged by the pursuing Egyptians.  Campbell managed to hold of the Egyptians and charged the my cavalry into their chariots.  I drove them back but I then blundered and 3 of my units fled to the rear facing away from the enemy.  The Egyptians pursued with their best remaining chariot unit but my disordered cavalry who had not fled defeated them in melee so saving their more craven comrades.

On our left flank Daves heavy chariots rumbled into the Israelites driving back their front line of infantry and pushing back the troops deployed behind them.  Another move of melees drove the back rank of the Israelites of the table.  At that point ended.  We had broken 2 of the enemy divisions but had not won enough of a victory -  to recover from not getting the Ark of the Covenant of the table.

Egyptians attack infantry division.....
General Briefing
As the Assyrian Empire extends, in the west it begins to rub against the Egyptians, and in particular, their satellite nation: Israel.
The King of Assyria, Da Obron, leads a surprise attack into Israel, and pillages Jerusalem. He retires towards Nineveh with his spoils, including a wooden chest, which may contain the Ark of the Covenant.
Just west of the River Jordan, the Assyrian rearguard spies two clouds of dust emerging from the west. In quick order one resolves itself into the Egyptians led by the famous General of the Pharoahs, Olle Re  The other appears to be led by the Chief Priest of the Temple of Solomon, Colleviticus.
The Assyrians begin the game in a double width column along the road, with its head having just reached the ford. The ford is two units wide.
The game is won by the Assyrians if they can get the wagon train with the Ark of the Covenant off the east end of the table.
There are decisions to be taken.  Players refer to individual briefings on the night.

Infantry division commander inspires his troops......

Assyrian Briefing and OB
You begin the game in a column on the road to the ford. The head of your column has reached the ford, which can be crossed at half pace. It is only one unit wide.
You have a report from a spy that the Egyptians have a force east of the River Jordan. Where it is, or the size of it, is uncertain.

Assyrian Army: 3 divisions
DIV 1  5 Heavy Chariots. Division breaks on loss of 3 chariots
DIV 2  5 Units of Cavalry. Division breaks on loss of 3 units
DIV 3  4 units of spear and bow armed infantry; 2 units of bow and sling armed infantry; 2 units of spear and bow armed light infantry; 1 unit of Elamites; 3 units of bow armed skirmishers; 1 unit of javelin armed skirmishers. Division breaks on the loss of 5 non skirmish units.
Did I also mention that you can also win by routing both the enemy forces (Egyptians and Israelites fight as separate armies), as well as getting the Ark of the Covenant off the board?

Egyptian/Israelite Briefing and OB
The Israelite player gets to roll a dice every turn. On a six, the Ark of the Covenant explodes onto light (you have seen the films) and kills all the Assyrian drivers of the wagon train. The wagon train can only be re-crewed by a unit touching the wagon train, and moving off again next move.
If adjacent to the River Jordan at any point, The Israelite can pray for a crossing, which succeeds on a 6, then a 5 or 6 in the second turn and so on, getting progressively easier. Only Israelite forces can use this crossing. It is one unit wide, and crossed at half pace.
The subsidiary Egyptian force can appear anywhere east of the River Jordan, on the northern edge of the board, but not closer than 30 inches from an Assyrian unit, and only after the Wagon Train is 24 inches east of the ford on the road.

Egyptian Main Force: 3 divisions
DIV 1  4 Chariots; 4 chariot runners. Break on 3 or more losses of chariots
DIV 2  2 Egyptian spearmen; 1 Kushite; 3 bow armed skirmishers. Break on loss of 2 or more non skirmishers
DIV 3  2 Egyptian Axemen; 1 Sherden Guard; 3 bow armed skirmishers. Break on loss of two or more non skirmishers
Israelites: 3 Divisions
DIV 1  4 chariots; 4 chariot cavalry out-riders. Break on 3 or more chariots lost.
DIV 2  3 Judean spearmen; 2 bow armed skirmishers; 1 javelin armed skirmishers. Break on loss of 2 or more non skirmishers.
DIV 3 3 Judean spearmen; 2 javelin armed skirmish infantry ; 1 bow armed skirmish unit. Break on 2 or more non skirmishers
Egyptian flank force
DIV 4  2 chariots; 6 Egyptian spearmen. Beak on the loss of 5 units

Monday, October 8, 2012

NAP: 2nd Salamanca or The River Tormes 12 November 1812

I was away this weekend at the Manor House hotel at Lundin Links  in Fife for a large scale 28mm Napoleonic game. It was played by 10 gamers from AB1 group, largely members of the SESWC,  over 2 days and was a hypothetical battle set during Wellington’s retreat from Burgos and Madrid in November 1812.   The rules used were Black Powder with the revised  turn sequence. It was great fun with masses of troops.

We fielded 132 infantry battalions, 36 cavalry regiments and 50 guns - an approximate total of 4,000 figures.  The table was 27ft long by 6ft wide.

Clausel launches the Chasseur Brigade towards Calvariza....
My original idea was to refight Salamanca but as we had missed the 200th anniversary I came up with this hypothetical scenario set near Salamanca in November 1812.  It is a what might have been battle.  It assumes that the combined French armies facing Wellington army decided to adopt the aggressive plan of Marshal Jourdan rather than the  historic distant flanking movement of Marshal Soult which forced Wellington to retreat to Cuidad Rodrigo without accepting battle.

Right flank - British still hold Cristoval and threaten to recover the ford
I will add a separate page to the blog with all the background, player briefings, OB, deployment limits and map of the table game. 

More photos and descriptions at
http://www.flickr.com/photos/bill26048/sets/72157631714986602/

Here is the real historical background.
Following the victory at Salamanca on 22 July 1812 Wellington went on to liberate Madrid and then leaving Hill with half of the allied army to hold Madrid and Toledo turned his attention to the siege of Burgos. 
Lacking sufficient heavy artillery and the skilful defence of the castle by Dubreton this proved beyond the powers of his army.  Threatened by a reorganised and reinforced Army of Portugal under Souham Wellington raised the siege of Burgos on 21 October. He quietly slipped away, undetected by the French until late on 22 October. The drawn Battle of Venta del Pozo was fought on the 23rd. Between 25 and 29 October, Souham and Wellington fought a series of actions along the Pisuerga and Carrión Rivers at Palencia, Villamuriel de Cerrato, and Tordesillas which are collectively called the Battle of Tordesillas. When the French seized the bridge over the Duero River at Tordesillas on the 29th, Wellington was compelled to order a further retreat.
On 29 October, Hill received Wellington's positive order to abandon Madrid in the face of the advance of the combined forces of Soult and King Joseph from Valencia and march to join him.  After a clash with Soult's advance guard at Perales de Tajuña on the 30th, Hill broke contact and withdrew in the direction of Alba de Tormes. Joseph re-entered his capital on 2 November. Anxious to destroy the British, Joseph and Soult rushed after them without bothering to leave a large garrison in Madrid.
The Allied retreats continued until Wellington and Hill joined forces on 8 November near Alba de Tormes south east of Salamanca.  By 11 November, the combined French armies faced Wellington's Allied army near the old Salamanca battlefield.   This is the starting point of this game.

View of French centre and right - Spanish about to attack near windmill
General Briefing
The Anglo/Portuguese/Spanish army is deployed in a line with the right at Alba de Tormes on the river Tormes, the centre on the low ridge at Calvariza Ariba with the left separated by the Tormes from the centre at  San Christoval.   Note that Alba de Tormes itself is of the table to the south.    The combined French armies are deployed on the east bank of the Tormes and to the east of San Cristoval north of the line of the Tormes
The River Tormes runs north behind the east edge of the table before veering west across the table towards Salamanca which is of table to the west.  The Tormes is fordable at many points above Salamanca towards Alba especially on its northern run between Huerta and Villa Gonzalo.

View from French left - Jourdans attack well underway - despondent Brits in background
The Setup
The British players from south to north were Chris Henry (Clinton), Angus Konstam (Ned Packenham), John Glass (D’Espana), John Perkin (Wellington and Leith) and Chris Stone (Lowry Cole).   The French players from south to north were Ken Pearce (Jourdan), Dave Imrie (Clausel), myself (Soult) and Jack Glanville (D’Erlon).  Donald Adamson (King Joseph) based his headquarters in the fine buildings of the convent of Huerta beside my command.

The British had 12 brigades deployed on the table at the beginning of the game split equally across its 3 quarters.  They had a further 6 brigades in local reserve with a distant reserve of 2 more brigades under Wellington’s direct command. 

The French had 20 Brigades in their initial strike force with 6 on each flank and 4 in each of the centre commands.  Some of these brigades began on table and the others could be attempted to be ordered on one per turn per table quarter.  The French had a further 7 brigades in  a general reserve with 2 allocated behind each flank and 3 to the centre.  The French plan was a double envelopment with their massed forces on the flanks with the centre acting defensively except Clausel who also had to support Jourdans attack in the south.

Spanish develop attack in centre.  King Josephs guard hold firm....
The River Tormes where it dissected the table was only crossable at the ford south of  Cristoval.  However event cards allowed other fords to become usable when the river ran low.  The hills were good going, blocked line of sight and allowed overhead fire by artillery.  The woods could be crossed by formed troops at half speed.  The villages were each represented by a single Black Powder built up area, while the windmill and watermill that appear in many of the photographs were just for scenic effect.

How the game played
As planned the French launched their attacks on each flank.  Only in the centre right (my command) was the build-up of the strike force effected by poor command rolls .

Vistula legion veterans lead Derlons advance....
On their right flank in the north beyond the bend of the River Tormes under D’erlon the French made good progress - their overwhelming numbers fairly rapidly destroyed a British infantry brigade.   The British commander retired 2  battalions south of the ford to hold the river line whilst leaving a reaguard of a battalion and a gun in Cristoval.  A gallant cavalry action between the British light dragoons and the Polish lancers lasted many turns on the far flank until finally both the British regiments broke and fled.  The Lancers played little further part in the action as both regiments were shaken and their brigadier repeatedly failed to rally them.  The French brought up 6 battalions to attack Cristoval but due to poor coordination their attacks failed.  Late in the game the British brought 2 reserve infantry brigades onto the table on the flanks of  Cristoval and they provided support to the heroic garrison who were still holding out.

Lancers versus light dragoons - a long struggle of charge and countercharge
Marshal Jordan’s attack in south on the French left flank made good progress and drove deep into the British line.  The large number of French infantry committed on this front restricted the space available to commit their cavalry reserve.  Wellington committed most of the British heavy cavalry and veteran infantry in reserve on this front.  These additional troops steadied the British line and at the end of the day they had regained a large part of their initial position though at the cost of most of the heavy cavarly . 

British hold firm but French still have the numbers....
On the French centre left Clausel launched an attack in the area of the Watermill to distract British troops from Jourdan’s main blow.  They became engaged in a long fire fight with Portuguese and  British infantry under Pakenham which lasted until the end of the game.  The entire French foreign brigade was lost in this interminable action. 


With this attack stalled Clause then launched his Chasseur brigade forward in an impressive 4 battalion massed column against the Portuguese defending near the church of Calvariza.   The eventually drove back the front battalion of Portuguese but at the end of the game the Portuguese were still facing them in warlike formation and firmly held the old church building.

Portuguese holding firm at Calvariza....
In the French centre right, where I commanded as Soult, the early part of the game was very quiet with some skirmishing and artillery duels.  With the worsening situation on the allied flanks Wellington decided on the second day of play to launch the Spanish supported by a British brigade in an attack on this sector to break through the French centre and so relieve pressure on the flanks and win the battle.


My 2 French infantry brigades made a brave defence even breaking charging British and Spanish infantry with steady closing fire.  My brigade near Huerta was reduced to a single battalion but it was reinforced by a brigade of D’Erlons which crossed the river by a secret ford and was led into the action by King Joseph himself.  I confidently committed my French dragoon brigade against the Combined Portuguese and Spanish cavalry but a shaken stationary Portuguese light dragoon regiment managed to defeat both my regiments in turn.  Eventually after some urgent rallying of the dragoons they succeeded in driving the Spanish horse back beyond the ridge of Calvariza.

Dragoons ride to their initial defeat by the Portuguese.....
In the end I declared the game a draw on the day but the British considered that it was a winning draw on their side.  That might be the fairer result.  The main French attacks had been held and they had not taken any of their objectives.  The Allied counter-attack in the centre had stalled and the French still held a considerable numerical advantage especially on the flanks.