Thursday, April 23, 2020

BLACKPOWDER V2 TIPS FOR PLAYERS No 4: RISK TO COMMANDERS


RISK TO COMMANDERS.

After a question on the TGG Friends Group I thought I should clarify these rules.  This applies to command figures – brigadiers and higher ranking officers.  We are using the rules set out at page 74 of the BP2 book.

Importantly these figures cannot be individually targeted by shooting or attacked in hand to hand combat.  

If they are displaced by a moving enemy unit and there is no friendly unit within a normal move then they fall casualty.  This is very rare in fact I have never seen it happen.

They are only really at risk if they have joined a unit – either by giving a successful Rally or Follow me Order when they must join the unit involved or by being displaced to a friendly unit by enemy unit movement.  They are considered attached to the unit until the start of their next turn.

If the unit is destroyed then the commander is also removed.

If the unit suffers excess casualties (i.e. over their shaken level) due to shooting or hand to hand combat roll a dice for each excess casualty - any score of 6 results in the commander being removed as a casualty.

LOST COMMANDERS

There is no rule in BP2 about what happens when a commander becomes a casualty.  The convention we have used in previous games which we are using for TGG is that they are replaced by a substitute at the end of their side’s next movement phase.  This substitute has a command level 1 less than the original commander (usually 8 down to 7).  They are a less experienced subordinate or possibly a favoured nephew.

Wednesday, April 22, 2020

BLACKPOWDER V2 TIPS FOR PLAYERS No 3: CAVALRY CHARGING INFANTRY AND SQUARES

Introduction

I thought it would be useful to run through the rules for cavalry charging infantry and squares.

In TGG we are using the ‘Battalion Square’ rules described at Page 88 of the rules.  These squares are formed by the individual infantry battalions.  The large multi-unit ‘Brigade Squares’ described at Page 91 of the rules are not appropriate to Napoleonics as they are formations from nineteenth century colonial actions. 

A Battalion Square can be formed by a unit in the command phase or as a reaction to a charge if a unit has the ‘Form Square’ special rule.  All the Napoleonic infantry battalions have the ‘Form Square’ special rule which is probably better called ‘Must Form Square’.

Unengaged units that have the ‘Form Square’ special rule even if disordered must as their charge response attempt to form square when charged by cavalry to their front.  They have no choice in this matter. If charged to their flank or rear they cannot respond to a charge.  A unit that attempts to form square as a response to a cavalry charge cannot deliver closing fire – attempting to form square is its charge response. 

A charging cavalry unit must have enough movement to reach the charged infantry unit.  The cavalry unit moves until it is 3” away from the infantry unit.  The infantry unit using the ‘Form Square’ response tests to form square by rolling 2 D6.  On a score of 12 the infantry unit forms square but is disordered.  On a score of 2 the infantry unit does not form square, becomes disordered and receives the charge at the halt.  A disordered unit that successfully forms square is still disordered.

Cavalry can only declare a charge against or charge home on a disordered or shaken square.  The cavalry get no charging bonus including any from Special rules in the combat.  Cavalry must charge home if able to do so.  If they cannot charge home the cavalry unit can use whatever movement it has left to move back or move around the side of the square as preferred.  I must admit I have never seen this move around option used in a game.

Other important things about Squares

A unit cannot move or come out of square if enemy cavalry are within 12”.

A square can make 1 move per turn at half speed towards its base line and this is a free move like for march columns.

A square has 1 shooting dice per face.

A square fights with no more than 2 dice per face.  If engaged on multiple faces the total dice used in combat by the unit cannot exceed its hand to hand value.”
.

A square gets +3 combat result when fighting enemy cavalry, but this is negated if also fighting enemy infantry.     

Squares cannot be supported but can support.

A square ignores all break tests results other than Break.

My final tips

Cavalry should charge infantry in their flank.  It is very difficult to beat even a shaken square that cavalry can charge home on.

If your cavalry move back and remain with 12” of a square, try to ensure you have units to fire at the immobile square in your next turn.  Squares are vulnerable to artillery and also musketry as they have few firing dice.

Shake the enemy infantry before you countenance sending in your cavalry in frontal attacks.

Monday, April 20, 2020

BLACKPOWDER V2 TIPS FOR PLAYERS No 2: OPTIONS FOR VICTORIOUS UNITS


Introduction

For my second set of tips I decided to deal with the options for Victorious Units. This section of the V2 rules has significant changes from V1.  A Victorious Unit is one which has been in Hand to Hand combat, and all of whose opponent enemy units either Retire or Break.  It can do the following actions see Pg 72.

ADVANCE UPON THE RETIRING ENEMY

SWEEPING ADVANCE

SWEEPING ADVANCE AND CHARGE

DO NOTHING

CHANGE FORMATION

FALL BACK

OCCUPY BUILDINGS

The first 3 three options are new or amended compared with version 1 of the rules. See Pg 73.

ADVANCE UPON THE RETIRING ENEMY

The unit moves back into contact with the retiring enemy unit.  It must have a normal move that allows it to do so.  So, infantry cannot Advance Upon Retiring enemy cavalry.  A Victorious Unit can do this even if Shaken or Disordered.  The engagement continues in the following turn with the advancing unit counting as having won the previous round.  If there is not enough space to move or the Retiring unit has retired through Friends, then the ‘Advance Upon’ cannot occur.

SWEEPING ADVANCE

This is only an option following the first round of a combat where the unit charges or counter-charges and the enemy either Retire or Break.  The unit can make a move to its own front up to its usual move distance without contacting the enemy.  Disordered units cannot make a Sweeping Advance.

SWEEPING ADVANCE AND CHARGE

This is only an option following the first round of a combat where a cavalry unit   charges or counter-charges and the enemy Break.  The unit can make a Sweeping Advance to its own front and charge an enemy unit.  This creates a new combat engagement which is worked out immediately.

Units which are Disordered or Shaken cannot make a Sweeping Advance and Charge.  Cavalry units can only make a Sweeping Advance and Charge once during a turn.  However they can make a Sweeping Advance and Charge followed by a Sweeping Advance.

The enemy being charged by the Sweeping Advance can only respond by Holding their Ground or Turning to Face if cavalry.   So there can be no response of closing fire, counter-charging, evading or forming square.  This makes Sweeping Advance and Charge very dangerous.

Note that British Heavy cavalry with the Gallop useful rule, if able to do so, must always make an Advance Upon the Retiring Enemy, a Sweeping Advance or a Sweeping Advance and Charge move, even if this takes them off the table.

Saturday, April 18, 2020

BLACKPOWDER V2 TIPS FOR PLAYERS No 1 DISENGAGING

I thought I would let you see the tips for players that I produced for the players before The Great Game in Glasgow.  Here is the first of the four of them.  The others will follow over the coming days.

Introduction

It may be glorious to get all of your units heavily involved in the action but that may well not allow you to get to day 2 of the Great Game with some of your units intact.  We want as many players as possible to get to Day 2.  This is not tactical advice on formations/reserves etc. - its all about what you can use in the rules.

It is important to know how you can withdraw your units and how to recover their strength.  Firstly understand when to retire your units which have heavy casualties especially once they get to a Shaken state i.e. Casualties equal to their stamina, as any further casualties from shooting will make them take a Break test and they are vulnerable in hand to hand combat.  Secondly understand how to recover casualties from units and make full use of it

Note that units in Hand to Hand combat cannot be Ordered including Rallying Pg 67.

How to disengage

Retire under Initiative

A unit which is unengaged can use an initiative move to retire facing the enemy Pg 36.  They can interpenetrate friendly units with no penalty Pg 37.  You can also attempt to order them to make multiple moves away from the action but that is not guaranteed.

Disorderly Retreat

An unengaged disordered unit within proximity range of the enemy can use an initiative order to make a Disorderly Retreat Pg 51.  This allows them to retire facing the enemy but they do not recover disorder at the end of their turn – their disorder lasts to the end of their following turn.  Best to represent this with a 2nd disorder marker and simply remove 1 at the end of their turn.  This is new in version 2.

Fall Back

A unit which in hand to hand combat makes all of its engaged opponents Break or Retire can make a move to its rear even if disordered.

How to Rally

Infantry battalion and cavalry regiment commanders plus Brigadiers & Divisional Generals can issue a Rally Order to one of their units each turn if it is within 12” of the command figure.  “Rally round me lads!” Pg 34.

If successful the commander moves to the unit, joins them and removes a casualty from them.  It is the last command that the commander issues in the Order phase.   A unit with one casualty cannot be given a Rally order so the final casualty can never be removed.

The command figure remains with the rallied unit until the end of their opponents turn.  This does make the commander risk being a casualty if the unit suffers excess casualties pg 74  or being lost if the unit breaks as the result of a break test pg 74.

The other way to lose Units

Also remember that units which Retire from Hand to Combat have to make a full Retire move and if they end up on top of a friendly unit at the end of their move they get to make a 2nd Retire move.  If this 2nd move also ends up with them on top of another friendly unit they Break and are Destroyed.  So be aware of the available space behind your units.

Wednesday, April 1, 2020

BACK OF BEYOND: BOKHARA 1919

On the weekend of 7/8th March I joined the AB1 Group of gamers for one of our seasonal big games – a Back of Beyond extravaganza ‘The Struggle for Bokhara’.  The game was held in the Sea Scout Hall in Methil, Fife.  The staff at the hall provided tasty morning rolls and lunch.  Chris Henry and Donald Adamson developed the scenario with Donald acting as umpire on the day.  We used Setting the East Ablaze version 2 which is a definite improvement over the original version, and it gives an enjoyable quick game.  
The Daily Llama (Jack) and Prof Pollard (Nicol) plot their victory
I was one of the 2 Bolshevik players and our objective involved completing a railway line to Bokhara.  On our table we faced hordes of Tibetan warriors and a group of Scottish archaeologists supported by various university OTCs and a non-sectarian Glasgow razor gang.  
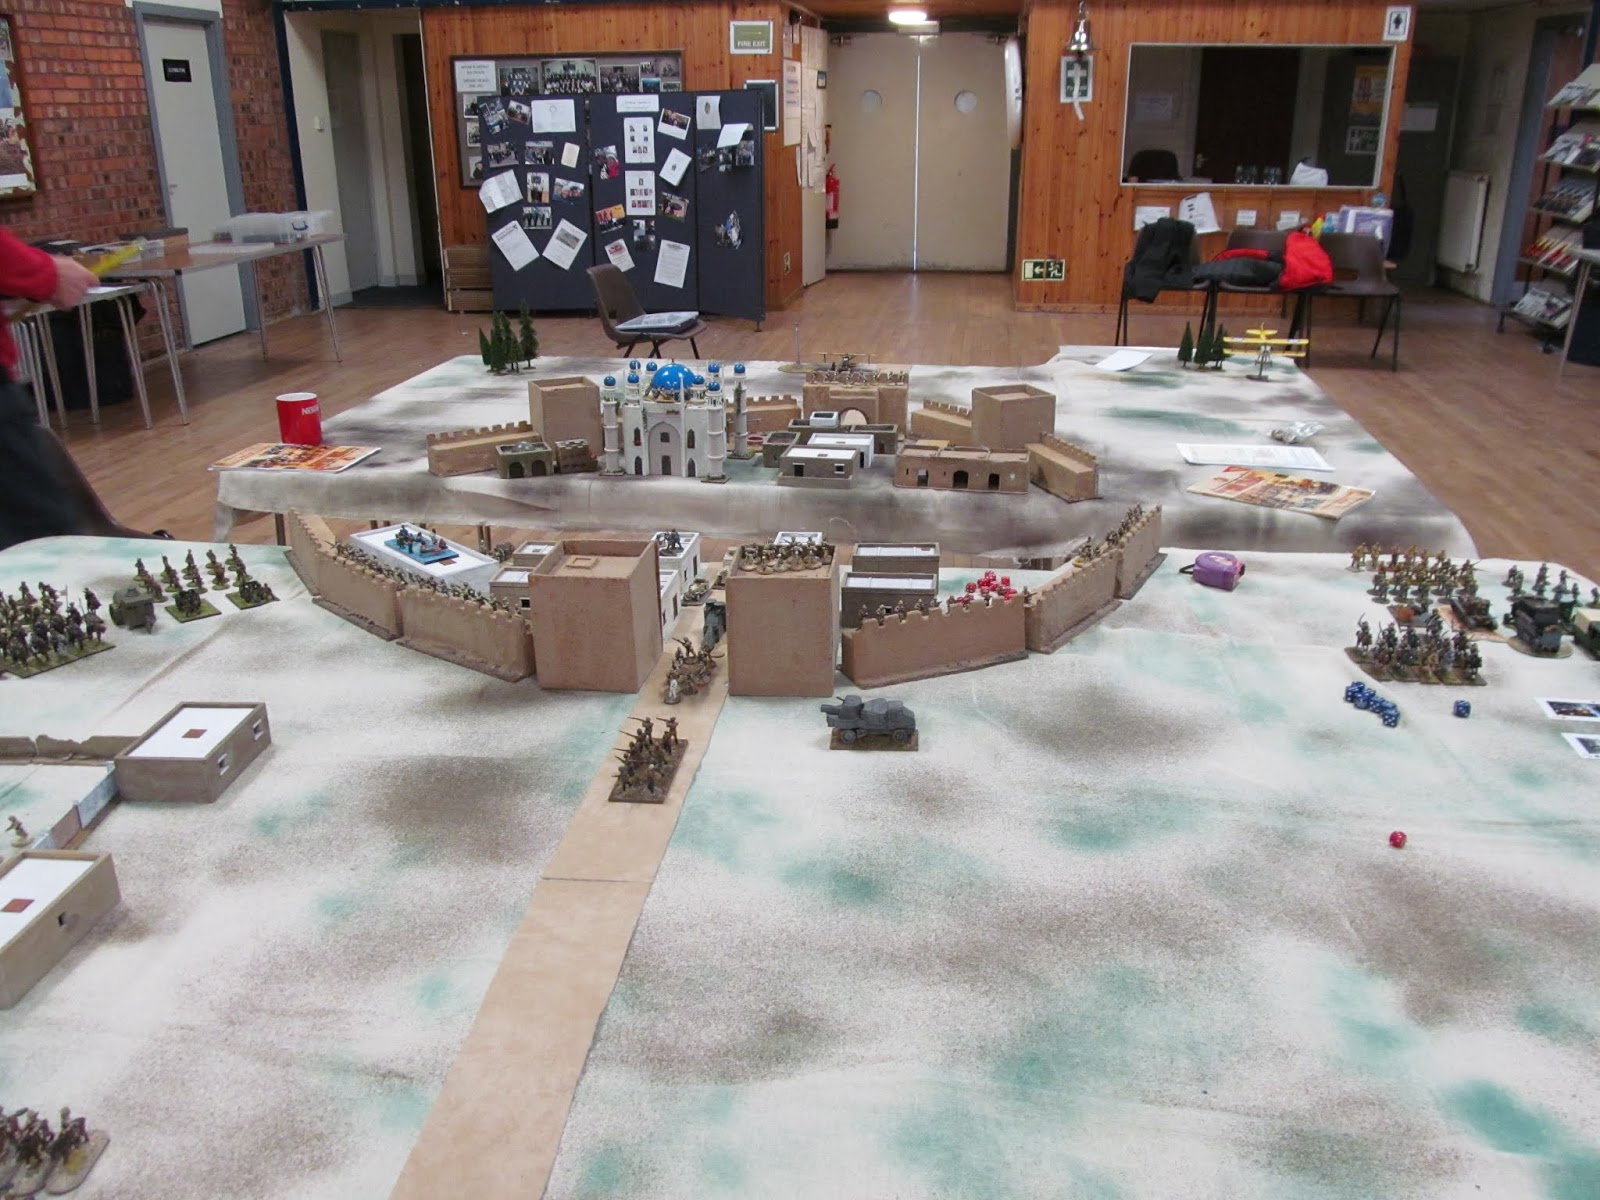
On the other table was the walled city of Bokhara, held by the Emir ad his Arab allies, which was threatened by the advancing Polish emigres and the Whites.  Ian who was going to command the Arab allies could not make it to the weekend as he was ill but not with Corona virus.  Chris took on that role substituting spare Turkish and auxiliary figures for the missing Arabs.
The Temple of Ahur Mazda
On our table we began skirmishing fairly seriously with the forces of the Daily Llama who at one point looked liable to overrun the railway.  The archaeologists were attacked by the Arabs but held them off.  Our actions ended when we realised that the Forces of Freedom had done a deal with the Emir and they were all advancing on the Altai Mountains and the railway line.  What followed was a long struggle with the 4 players from table 1 vs 4 players from table 2 and 3.  No player could pick an aircraft as part of their starting force.  They were all allocated due to special events.  The Forces of Freedom both got an aircraft and they caused havoc with their ground attacks on the way to bombing the coal yard at the Red railway depot.  I eventually got an aircraft which made 2 moves over the table before it was shot down by some White riflemen – the horror of it.  At the end we decided that Bart as the Polish player had been the most successful player due to his boldness and sheer luck in discovering additional artifacts by way of special events. However, the team prize went to the unlikely combination of Nicol and Jack who successfully got their excavated treasure back to the rail head and thence to the Hunterian Museum of the University of Glasgow via Kiev.
The Emir's palace in Bokhara and the inviolate city walls
A good fun weekend and sadly our last meeting until the Corona Virus crisis is over.    Below is a link to my photos on Flickr.

https://flic.kr/s/aHsmLW8mBT

Here are the briefing notes Donald prepared for the players:

Supreme Command of the Soviet Steppes

Players: Bill (friend of Stalin) and David (friend of Trotsky)

The Soviet Generals are very keen to take over Bokhara. So keen in fact that they are building a railway towards the city.  This may not be unconnected to gold that is contained in the Treasury of Kublai Khan which is thought to be within the city.

OBJECTIVE: Take the Treasury into the hands of the Soviet peoples!

Starting Point: Railway terminus

Forces: Each of the Generals can take 5 squads of 10 plus two support weapons plus two vehicles.

Forces of Freedom (Whites)

Players: Jim (White Russian) and Bart (Poles)

The White Russian General is happy to ally with the Emir of Bokhara, but briefly. He wants to destroy the soviet railway terminal, and if possible, pick up some loot as well.

The Polish general, firmly on the side of the Whites, is not unaware of the gold that is contained in the Treasury of Kublai Khan which is thought to be within the city. He has also heard rumours of the fabled temple of Ahur Mazda, and the legendary riches which it is said to contain.

OBJECTIVE: Destroy the railway terminal, kill reds and enrich yourselves.

Starting Point: Eastern edge of the board

Forces: Each of the Generals can take 5 squads of 10 plus two support weapons plus two vehicles.

Forces of Archaeology (and friends)

Players: Nicol (Professor Pollard) and Jack (The Daily Llama)

The Professor may be an academic, but he is not naïve. He has brought members of the OTCs of the Universities of Glasgow, St Andrews, Aberdeen and Edinburgh plus 10 thugs from the East End of Glasgow (The Billy Bhoys, a mixed religious gang). He needs to spend some time excavating, before making his way to the rail terminal where he has bribed the staff to take him to Kiev and the west.

The Daily Llama (Eton and Balliol) shares these goals, although he is keener on attacking the Bokharans and Arabs who have recently burnt a Buddhist monastery in the Altai mountains.

OBJECTIVE: Defend the Mountains and the sacred site of Ahur Mazda. Then seize the railway terminus.

Starting Point: Temple of Ahur Mazda

Forces: Professor Pollard can take 4 squads of 10 [OTC] plus 10 archaeology guards plus two support weapons plus two vehicles or planes. The Daily Llama gets five squads of Tibetans plus two support weapons plus two vehicles.

Forces of Emir of Bokhara

Players: Peter (Emir) and Ian (Arabs)

The Emir of Bokhara has trained his army on Turkish lines. He wants to destroy the Soviets and their railway terminal but does not trust the White Russian forces. He is outraged to hear that western archaeologists are in the mountains of his realm and disturbing the spirits of his ancestors in the Temple of Ahur Mazda

The Arab general shares these goals, although he is keener on attacking the Tibetan raiders (who are with the archaeologists) who have recently been raiding his oases in the south of the country,

OBJECTIVE: Destroy the railway terminal, kill reds and safeguard the sacred temple in the mountains (killing the Tibetans on the way).

Starting Point: City of Bokhara

Forces: Each of the Generals can take 5 squads of 10 plus two support weapons plus two vehicles.
Tables 2 and 3 with Bokhara - the Forces of Freedom skirt the city


The great struggle begins
Dave's Trotskyite Guard detrain - lovely red leather outfits - in background my armoured car burns

My galant aircraft - it never fired a shot!!!!