Tuesday, October 29, 2013

28mm WWII BOLT ACTION BIG WEEKEND GAME


I was away at the weekend at Old Manor House hotel at Lundin Links in Fife for a large scale 28mm WWII Bolt Action game.  Over the 2 days 10 gamers attended from our AB1 group, largely members of the SESWC.  The games for the weekend were set during the Operation Husky the allied invasion of Sicily in July 1943.
Scout car calling up artillery support
On the first day we played 3 of 4 scenarios – a river crossing, supply dump, Gela airfield and a night mountain attack.  John Glass and Ian Carter devised all the scenarios.  Each of us put in the field  a reinforced Bolt Action platoon of 750 points - mine was a Canadian force of an infantry platoon supported by a Sherman and a Humber armoured car. 
My barge falls short - a bad moment
In my first game against Jack Glanville’s Germans things were going well until my artillery barrage fell short and hit 5 of my 8 units.  In my second game Angus Konstam and I managed to defeat Ian Carter’s Germans who had the thankless task of holding defences around Gela airfield.  My third game against Dave Imrie proved to be a hard fought draw.
Germans defending the impressive bunker
On the Sunday we played a single large game based on a German force retreating towards Messina with US, British and Canadian troops attempting to cut off their retreat.  As well as our original force from the day which was now motorised  and we could field extra heavy equipment as reserves.
Vital bridge on road to Messina hit by allied airstrike

Shermans withdrawing from German fire
Things at first went well with the allied attack on my flank but my leading Sherman suffered pins and retired for 3 moves.  An Italian airstrike then further pinned my forces and only after much reorganisation did the advance get underway again.  In the end the overall weekend was judged an Axis victory as they had destroyed more of our units and we had deployed more of our reserves.
Shermans regrouping in cover
 
It was an enjoyable weekend.  The Old Manor at Lundin Links is a good venue and we will be back in the spring next year for an 18th century Imagination weekend. 

All my photos with descriptions at
http://www.flickr.com/photos/bill26048/sets/72157637058529345/

Monday, October 28, 2013

28mm AWI MAURICE CAMPAIGN GAME 6 – BATTLE OF DAVE'S PLANTATION


On Friday Dave Paterson and I played out the 6th game in our Maurice AWI campaign – the  Battle for Dave's Plantation.   Here are the forces for this game.
PATRIOT
8 TRAINED REGULAR INFANTRY
4 CONSCRIPT REGULAR INFANTRY
1 TRAINED REGULAR CAVALRY
1 CONSCRIPT REGULAR CAVALRY
2 ARTILLERY
2 IRREG INFANTRY
National advantages
OBLIQUE ORDER
Army Morale 16

British centre

BRITISH
3 TRAINED REGULAR INFANTRY
5 CONSCRIPT REGULAR INFANTRY
1 TRAINED REGULAR CAVALRY
3 ARTILLERY
1 IRREG INFANTRY
National advantages
OBLIQUE ORDER, RALLY TO THE COLOURS, A LA BAYONETTE
Notable Reverend Whitehead
TOTAL Army Morale 11
Advanced Rules in use – Oblique Order, Light artillery, All Guns bombard, Honours of War

This time Dave won the scouting role and surprisingly for me decided to be the attacker.   Dave as the attacker took an additional unit of regular infantry for his mercenary supplement to boost his now very low grade infantry.
Dave's left wing after their epic forest march
 I deployed 6 infantry units and my 2 guns in my centre left, with 6 units of infantry on the centre right, the cavalry were in reserve behind the centre and the irregulars were positioned in woods along the battle line.  Dave deployed his 4 trained infantry plus 2 conscripts and the 3 guns on his centre right with 3 conscript infantry holding his left.  His cavalry were deployed behind his left with his irregular infantry holding the fence line on the far right.

Patriot left goes against flankers in woods
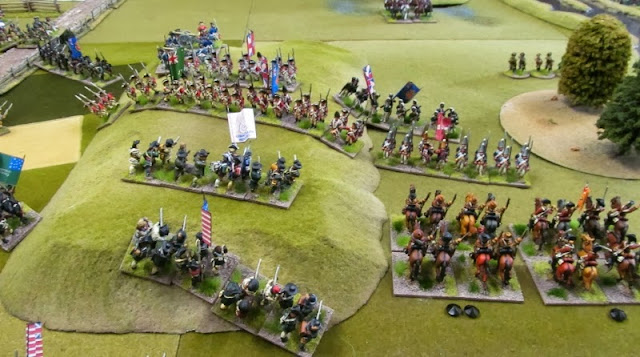
At the start of the game Dave moved his 3 left flank conscript infantry thru the woods lining the left flank of the table and formed them facing towards my flank if I advanced on his centre.  However this move split his command so I decided to attack the conscripts in the wood whilst also sweeping my left centre into his main force.  Luckily for me the very effective Rev Whitehead was carried from the field after a single rally of a force.   I quickly broke the leading unit in the woods and his other 2 units played little further part in the action.    This time my attack on his right centre succeeded with me rolling up his right wing and bringing more troops to bear on his centre.  Dave threw his conscript cavalry into the fight and they broke one of my infantry units.  It was not enough to turn the game as his centre was being worn down by my more numerous volleys. 
Main Patriot attack goes in against British centre right
At the end when Dave’s army broke I had lost 6 units and Dave 8 units including all 3 of his trained infantry.  It was another decisive Patriot victory with 3 epic points won.  My irregulars and cavalry played no part in the action.  In the post game promotions I diced well and in our next action I will have qualitative as well as numerical superiority with 2 elite and 4 trained infantry versus Dave’s 2 trained infantry.  The Patriot’s could well win this years campaign.

All the photos from the campaign with descriptions are on flickr at
http://www.flickr.com/photos/bill26048/sets/72157635546751824/

Sunday, October 20, 2013

SKELP 2013 - FORFAR 19TH OCTOBER


This Saturday I went to Forfar to attend SKELP the Angus Wargames Club’s annual show.  Skelp is one of the smaller wargames shows in Scotland however it has all you expect from a show - demonstration and public participation games, trade stands, a painting competition (with trophies and prizes), a bring and buy sale, raffle, and Field Kitchen.  The Field Kitchen serves the local delicacy the famous Forfar Bridies but they ran out just after noon.
I helped Colin Jack, Mr Ray Neal, Dave O’Brien and Hugh Wilson with the SESWC display game which was a Bolt Action game set in the Chaco War between Paraguay and Bolivia.  Colin does keep finding obscure subjects for our display games.

SESWC - Bolivian garrison of the besieged Fortin
The game involved a Bolivian relief column including 40% of the Bolivian armoured corps – 2 AFVs out of a total of 5 in the army - attempting to relieve a garrison holding a remote fortin besieged by the Paraguayans.  It was a complete Paraguayan triumph as they wiped out the column and stormed the defences of the fortin.  All the troops are from the collection of Colin.  The Chaco war figures are by Scheltrum Miniatures.  Our display won the trophy for best display.


SESWC - Bolivian armour try to defend the column from the Paraguayans in the scrub
RAF Leuchars Wargames Club put on their superb carrier attack PP game.  Deservedly it won the trophy for the best PP game and the trophy for best naval game.

RAF Leuchars superb Carrier attack PP game
My other club Falkirk and District Wargames Club put on a PP game – A Lost World Adventure with explorers, angry natives, a hidden temple and the mandatory dinosaur!  It was judged 2nd best PP game.

Dinosaur runs amock in FDWC's  Lost World game


Kirriemuir Wargames Club's Charge of the Light Brigade PP game.  3rd best PP game

Colourful G-Racing PP Game. 
It was a good enjoyable day meeting fellow enthusiasts.  My purchases were limited as I only bought 2 sets of Litko counters from Erik at Figures in Comfort.  They will prove really useful in my Ironclad naval games.

Friday, October 18, 2013

ACW NAVAL - 1/600 TEST GAME 1

This week’s game at the SESWC was something different as I setup an ACW test game to try out the 1860-1870 period naval rules which I have been working on.  The 1/600 ships are all from the collection of Angus Konstam.

The scenario involved a Union force attacking a bay to capture cotton barges.   The Union had 3 ironclads and 3 gunboats versus 2 Confederate ironclads, 3 cottonclad rams and a coastal fort.  The Union led the way with their gunboat and ironclad squadrons supported by the Miami whilst the New Ironsides steamed very slowly along in the rear.
Cottonclads and gunboats prepare to engage
The Union gunboats were engaged in the narrows by the cottonclad rams.  The CSS Van Dorn seriously rammed the USS Mattasesett which eventually sank.  The CSS Van Dorn did not escape retribution and struck her colours after being set afire by the USS Sassicus.  The USS Sassicus suffered glancing ramming blows from the CSS Beauregard and set on fire and suffering command confusion she also struck. 
CSS Gen Bragg rams the stricken USS Mattasesett
The Union ironclads passed safely under the guns of the fort while the following USS Miami suffered from the forts and steamed on in a confused state.  Hits from the USS Tecumseh and the Keokuk forced the CSS Beauregard to strike and heavily damaged the CSS Savannah which broke of the action.  The Palmetto State fought on covering the flight of the Savannah. The last round of the game saw the New Ironsides finally get into the action and a single broadside smashed into the Palmetto State causing heavy damage and setting her on fire.  In total the Union lost 2 gunboats, one sunk and another struck, whilst the Confederates lost 2 gunboats struck and 2 ironclads heavily damaged.  
Ironclads and fort now get engaged in the action.  USS Mattasesett has sunk.
 
This was actually the very first test game and the rules generally worked well and were quickly picked up by the 6 players who had not read the rules in advance.  Some lessons learned have been incorporated in the latest update of the rules.  Further test games to follow……

Last round of the game - New Ironsides first broadside wrecks the Palmetto State setting her afire.

Here is the briefing for the 2 sides.

Union
Spies report that a considerable supply of cotton has been brought on barges to the Cape Fear River waiting for the arrival of fast blockade runners from Bermuda.

Commodore Du Pont has decided to launch a raid on the port to cut out the cotton barges.  This will strike a blow to Rebel finances and gain the commodore a substantial share of the prize money.  If the barges cannot be taken away they should be destroyed.
Ironclad Sqdn - Tecumseh, Keokuk

Gunboat Sqdn - Sassicus, Mattasesett
Command Sqdn - New Ironsides, Miami

Confederate

A considerable supply of cotton has been brought on barges to the Cape Fear River waiting for the arrival of fast blockade runners from Bermuda.  This is a valuable cargo and will allow the purchase of much foreign military equipment.  Such a valuable target may well be the objective of an attack by Du Pont’s blockading forces.
As well as the local coast defences a Cape Fear Defence flotilla has been scraped together from along the coast to protect this strategic location.
Ironclad Ram Sqdn – Savannah, Palmetto State
Cottonclad Ram Sqdn - Gen Beauregard, General Bragg, Gen Earl Van Dorn

Tuesday, October 15, 2013

28mm AWI MAURICE 4 ARMY BIG GAME

On Sunday as the last part of my busy week I set up a 4 player Maurice AWI game using most of my collection.  I commanded the British Army and Hugh Wilson the allied Hessian Army.  Colin Jack and Dave Paterson commanded the 2 Patriot armies.  We used the multi-player alliance game rules as set out in Maurice.

The Patriots won the scouting roll and decided that they would defend.   I picked an extra unit of regular infantry and Hugh added 2 units of Canadian irregulars.  The table was effectively split into 2 halves by a steep hill in the middle of the table which could only be climbed by irregular infantry. 

British army deployed

We began our advance against both wings of the Patriot army and Dave moved his cavalry to take up a position behind the central steep craggy hill so as to flank both of our attacks.  This tactic delayed our advance until Hugh’s Jaegers climbed the steep hill to bring the Patriot cavalry under fire.  Whilst we waited our troops were being bombarded by the Patriot artillery. 

Hessian army deployed - steep hill to their left
Once the cavalry threat was partly under control Hugh and I both advanced to the attack.  After an apparently successful infantry firefight on my flank I decided to make use of A La Bayonette and charged 3 units of my infantry.  It proved a debacle with my first elite grenadiers breaking and my other2 units being driven back in some disorder.  The action after that continued as a firefight on this flank and the British made some headway but with losses. 


Hessians begin their bomabrdment
On the other flank Hugh’s attack was worn down by the Patriot fire and faltered.  Hugh did eventually get all his irregulars into action but they could only help cover the withdrawal of his regular infantry who finally lost 6 units.   It was a long tough fight and it could have gone either way.  When our combined army morale broke the Patriots were then down to 5 morale points and there were only 6 cards left in the final deck.
British and Patriots exchange long range artillery
The British allied army lost 10 regular infantry, 1 irregular infantry and all 4 guns.  The Patriots lost 8 regular infantry, 2 regular cavalry, 1 irregular infantry and 2 guns.   None of the cavalry on the British side ever got into the action so no doubt they could cover the sad retreat. 

All the photos from the game with descriptions are on flickr at

http://www.flickr.com/photos/bill26048/sets/72157636543144093/

Here are the forces for this game.

PATRIOT ARMY 1
8 TRAINED REGULAR INFANTRY
2 CONSCRIPT REGULAR INFANTRY
2 TRAINED REGULAR CAVALRY
2 ARTILLERY
2 IRREG INFANTRY
National advantages
OBLIQUE ORDER, SKIRMISHERS
Army Morale 14

PATRIOT ARMY 2
6 TRAINED REGULAR INFANTRY
4 CONSCRIPT REGULAR INFANTRY
2 TRAINED REGULAR CAVALRY
2 ARTILLERY
2 IRREG INFANTRY
National advantages
OBLIQUE ORDER, SKIRMISHERS
Army Morale 14

British engaging the Patriot centre right for the 2nd time
BRITISH
2 ELITE REGULAR INFANTRY
4 TRAINED REGULAR INFANTRY
2 TRAINED REGULAR CAVALRY
2 ARTILLERY
2 IRREG INFANTRY
National advantages
OBLIQUE ORDER, RALLY TO THE COLOURS, A LA BAYONETTE
TOTAL Army Morale 10

HESSIAN
2 ELITE REGULAR INFANTRY
5 TRAINED REGULAR INFANTRY
2 TRAINED REGULAR CAVALRY
2 ARTILLERY
2 IRREG INFANTRY
National advantages
OBLIQUE ORDER, STEADY LADS
TOTAL Army Morale 11

Advanced Rules in use – Oblique Order, Light artillery, All Guns bombard, Honours of War

Saturday, October 12, 2013

28mm AWI MAURICE CAMPAIGN GAME 5 – ACTION AT HANNAH’S STABLES

As part of my busy wargaming week  on Friday Dave Paterson and I played out the 5th game in our Maurice AWI campaign – the Action at Hannah’s Stable.  Here are the forces for this game.

PATRIOT
4 TRAINED REGULAR INFANTRY
8 CONSCRIPT REGULAR INFANTRY
2 CONSCRIPT REGULAR CAVALRY
2 ARTILLERY
2 IRREG INFANTRY
National advantages
OBLIQUE ORDER
Notable Richard Chaffee
Army Morale 16

Patriot deployment - learning hard lessons - more concentrated and supporting lines.  Donkey objective in the stables.
BRITISH
5 TRAINED REGULAR INFANTRY
3 CONSCRIPT REGULAR INFANTRY
1 ELITE REGULAR CAVALRY
2 ARTILLERY
1 IRREG INFANTRY
National advantages
OBLIQUE ORDER, RALLY TO THE COLOURS, A LA BAYONETTE
Notable Reverend Whitehead
TOTAL Army Morale 11

Advanced Rules in use – Oblique Order, Light artillery, All Guns bombard, Honours of War

As usual I won the scouting contest and decided to be the defender.  Dave as the attacker took an additional unit of regular infantry for his mercenary supplement.  For this game we decided to class the 2 farms on the table as towns rather than as before as simply symbolic so that they gave extra defensive advantages.

My over enthusiastic cavalry being whipped
I deployed 7 infantry units and 2 guns in my centre left, with 5 units of infantry on the centre right, the cavalry were in reserve behind the right and the skirmishers were positioned in woods on either flank.
As in the last game Dave deployed his trained infantry plus both guns on his left with his conscript infantry holding his centre and right.  His cavalry were deployed on his far left flank with his irregular infantry facing the wood on the right flank.

Main bodies now engaged - Patriots have more reserves
At the start of the game Dave moved his cavalry quickly forward and occupied a hill on my right flank.  I countered this move by throwing my 2 cavalry units against them.  Only after I had moved into contact up the hill did I remember that my cavalry were conscripts and the Dave’s were elite.  A big mistake!  One of my units broke at once and the other retired.   Dave then moved his trained infantry forward to engage my right flank.  I countered this by moving my centre and right against his centre and left.  At the same time I was able to move an infantry unit to my right to engage his cavalry. 
View from British side - Hessians on right flank about to break
When the main firefight began most of our units were engaged.  Good cards, skill and lots of luck were on my side as my volleys and canister fire over a long time wore down and steadily broke Dave's units.  His infantry were never really able to get in a position to use his A La Bayonette advantage to any great extent.  He was having to use his actions to recover disruptions.  In the end when Dave’s army broke I had lost 4 units and Dave 9 – 5 infantry, both guns, the irregulars and the elite cavalry.  
Dave’s view after the game was that he made a mistake not continuing to exploit his cavalry’s initial success.  The campaign continues as I got what I needed - a decisive victory.
All the photos from the campaign with descriptions are on flickr at
http://www.flickr.com/photos/bill26048/sets/72157635546751824/

Busy Week Part 1

It is a busy week for wargaming as Mrs Gilchrist is away for a fortnight visiting friends. 

Monday night I went to my other club – Falkirk and District Wargames Club.  Dave Imrie, Jack Glanville and Ian Beal were doing a demo of their new  'Hollow Crown'  Late 14th early 15th century rules to the guys at the club. There were three Claymore Casting's armies on the table so it was the largest amount of Claymore Castings figures ever seen in a game.  The rules received a good reception.
Scots Schiltrons advances


Another view of the Scots
I sat in as an observer on a 15mm game of Longstreet which proved to be a decisive Union victory though the Confederates won twice as many Epic points.  I have been invited to join the clubs ongoing campaign.
Union dismounted cavalry line shoots down the Reb cavalry
On Thursday I went to Hugh Wilson’s where we played a Colin Jack 7 player 1919 Freikorps scenario.  We used  ‘Setting the East Ablaze’  rules.  The rules work well for a fun game with lots of casualties but there are a few minor amendments I think we could make.   Our Red faction stormed the financial faction of the town putting the Freikorps to flight.   We have left the table setup at Hugh’s and our next game will be the Freikorps counterattack but for that game we will try Bolt Action.   My thanks to Suzanne Wilson for providing our dinner.

Financial district already ruined by the Anarchist mobs
Freikorps flamethrower hits the armoured car LENIN
Full description of this game and links to more photos on Bart Zynda's blog at

http://asienieboje.blogspot.co.uk/2013/10/ruhr-1919-p2.html

On Friday Dave Paterson and I played the fifth game of our Maurice campaign at my place.  I will write a separate report on that game.  To round of the week on Sunday I am staging a 4 player Maurice alliance game with most of my AWI collection on the table.

Sunday, October 6, 2013

28mm AWI MAURICE CAMPAIGN GAME 4 – BATTLE OF RAY’S RIDGE

On Saturday Dave Paterson and I played out the 4th game in our Maurice AWI campaign – the Battle of Ray’s Ridge.  Given my heavy defeat last time my Patriot infantry were now largely militia conscripts but I did have the only elite unit. 
Patriot deployment - British are massed facing the Patriot left
 Here are the forces for this game.

PATRIOT
1 ELITE REGULAR INFANTRY
3 TRAINED REGULAR INFANTRY
8 CONSCRIPT REGULAR INFANTRY
2 CONSCRIPT REGULAR CAVALRY
2 ARTILLERY
2 IRREG INFANTRY

National advantages
OBLIQUE ORDER
Notable Richard Chaffee
Army Morale 16

BRITISH
4 TRAINED REGULAR INFANTRY
4 CONSCRIPT REGULAR INFANTRY
1 TRAINED REGULAR CAVALRY
2 ARTILLERY
1 IRREG INFANTRY

National advantages
OBLIQUE ORDER, RALLY TO THE COLOURS, LETHAL VOLLEYS
Notable Reverend Whitehead
TOTAL Army Morale 11

Advanced Rules in use – Oblique Order, Light artillery, All Guns bombard, Honours of War
British deployment with Hessians in position of honour on the refused right flank - main body on left

I won the scouting contest and decided to be the defender.  Dave as the attacker took an additional  unit of regular infantry for his mercenary supplement.  This raised his Army Morale to 11.

I deployed my Irregulars on the far left flank, 6 infantry units and 2 guns in my centre left, with 6 units of infantry on the right flank and the cavalry on the far right.  The main body in the centre left was deployed covering the objective which was my camp on a low Hill.  Dave deployed his 4 trained  infantry plus both guns on his left with his conscript infantry holding his centre and right.  The Hessian conscripts had the place of honour on the far right.

At the start of the game Dave moved his left forward and occupied his end of the large ridge facing my right wing.  I moved my right and centre forward to engage the conscript units on his right in a plan to envelope the troops he had on the ridge.   Dave tried to move his right away from this attack but I closed too quickly and he had to turn about and face my attack.  This time when the firefight started all our front rank units were engaged.  I broke the 2 Hessian units on the British far right but Dave’s conscripts broke 4 units of my centre left isolating the far left militia units.
Position at the ridge after cavalry repulse
The action was then all concentrated around the ridge.  I threw my cavalry against the Hessian grenadiers holding the British left wing but they were driven back and both shot down.    My infantry traded shots for many moves with the British infantry.  Their lethal volleys wore down my troops and their ability to recover disruptions with rerolls was amazing.  They were aided in this by the Reverend Whitehead whose preaching inspired the troops.  My elite New Hampshires proved their mettle resolutely holding the left flank of this action but when the British Legion after their success in the centre also engaged them they broke under the fire of 2 infantry units and 2 guns.  At that point rather fittingly my army’s morale broke – La Garde recule!
Elite New Hampshires in light blue stand steady.  My centre to left of road about to be swept away by the Legion

Things beginning to look bad on the ridge
 
The butchers bill at the end of this decisive victory for Dave was that I had lost 9 units - 6 infantry, 2 cavalry and a gun.  Dave had lost only 2 conscript infantry units.  It was another enjoyable game. 

We have decided that Lethal Volleys and Rally to the Colours together are simply too much for the British and Dave will exchange Lethal Volleys for a la Bayonette and a third artillery unit.  This may well make the games less one sided.  The campaign continues – I need a decisive victory in the next game to avoid defeat.

All the photos from the campaign with descriptions are on flickr at
http://www.flickr.com/photos/bill26048/sets/72157635546751824/

Saturday, October 5, 2013

28mm BOLT ACTION: NORTHWEST EUROPE 1944


On Thursday I went to SESWC for a Bolt Action game with John Glass set in Northwest Europe in 1944.  The club and I provided the terrain, John provided his German force and I borrowed a Canadian force from Colin Jack.  We played the game as a simple shoot them up encounter game.
My initial forces attack - Sherman in bad state.....but still running
 The game proved a particular disaster for me.  My armour support a 75mm Sherman was hit by both German AFVs, a Panzer IV and a Stug III, and suffered 2 stuns.  It was then hit by a mortar bomb giving it a 5th pin.  Given this in the next turn when I next commanded it – the Sherman failed and withdrew and was then destroyed by the Stug III.  My M10 Wolverine came onto the table from reserve and knocked out the Panzer IV.  The M10 then started supporting my infantry sections advancing on the village buildings.  John’s Stug III did some fast movement along the road and quickly knocked out my M10.
My armour now ablaze.....
My problems increased in the next turn when I commanded my first infantry section they rolled 12 and fired into my 2nd section.  I then commanded my 2nd section who also rolled 12 and fired into my PIAT team.  In another turn my infantry force fell apart and when the game ended I had only 8 figures left on the table.

The victorious Stug III