Saturday, September 22, 2012

NAPOLEONIC REDINHA 1811

This week game at the SESWC was a 28mm Napoleonic Peninsular War game played with Black Powder.   It was based vaguely on a rearguard action by Marshal Ney’s 6th Corps at Redinha on 11 March 1811 during the retreat from Portugal.

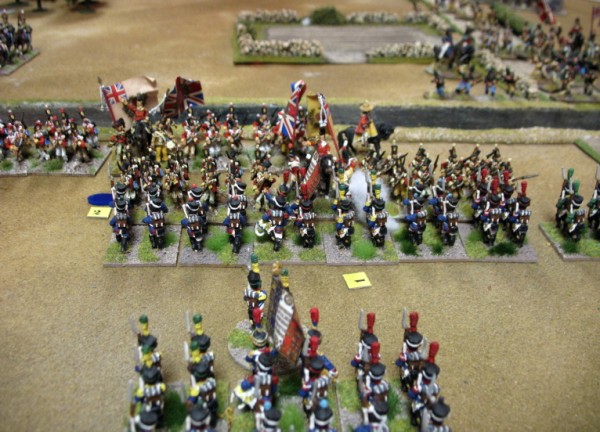
The fight in the cornfield - Irish column vistorious....
The Setup
I provided the scenario and Angus Konstam provided the pursuing Anglo-Portuguese forces whilst I provided the French.  We played down a 8ft by 6 ft table.  We used full scale movement and the revised sequence of play.  The French had three 3 battalion infantry brigades, a 2 regiment Chasseur a Cheval brigade and a single gun.  The Anglo-Portuguese had two 3 battalion British infantry brigades, one with a detachment of riflemen, a 4 battalion Portuguese brigade with 2 rifle detachments,  and a cavalry brigade of British Light dragoons and KGL Hussars.  Each of the allies had a gun.
 
Myself and Mr Ray commanded the French with 1 brigade and our single gun holding the farm and the line of the stream to its left, 2 infantry brigades were held back in reserve in attack columns and behind them were the chasseurs.  Angus deployed the allies with their cavalry on their  right flank, a British brigade in the right centre and the Portuguese commanded by Bart on the centre and left.  The remaining British Brigade was held of table intending to advance down the road - this was commanded by Campbell when he arrived later.

French army deployed - 1 brigade forward others in reserve

The allies took the imitative as the attackers and Angus sent his light cavalry across the stream on the allied right flank whilst the 1st British brigade engaged the French centre, Bart engaged the farm with his skirmishers and sent 2 battalions across the stream on his  left to outflank the French line.  The battle developed in these 3 sectors - the cavalry action on the allied right, the fight in the centre across the stream and the action around the farm with the flanking attempt.

The cavalry action - after much delay I managed to get the Chasseur brigade to move forward and take position on the French left on windmill hill were they observed the British light cavalry crossing the stream.  The initial charges saw the engaged regiment from each side retiring from a draw.  Then the KGL Hussars charged the other Chasseur regiment who counter charged and drove them back.  The Chasseurs then made a sweeping advance into the already shaken British light dragoons who could not react to the sweeping advance and broke them.  The KGL retired back beyond the stream and I followed up over the stream with both my regiments hoping to flank the allied army but the final charge ended in a draw with both sides retiring yet again.

British cavalry about to cross the stream......to their defeat.

In the centre - the British quickly lost their gun to lucky or skilful shooting by the single French gun.  The British moved forward  to the stream and silenced our French gun.  The French Irish legion battalion holding the road broke the British battalion facing it with their first volley!  Angus crossed the stream with his remaining 2 British battalions and charged a French battalion - who broke the lead British battalion in the melee.  The British survivors threatened by the arrival of French reserves withdrew back across the stream and waited for the arrival of the 2nd brigade under Campbell who moved forward and continued the action in the centre.  Eventually Campbell attacked across the ford into the by now shaken Irish battalion but they drew the melee.  The shaken British battalion retired back over the stream but the plucky Irish broke and fled.

British charge French as reserves move up

Last fight of the galant Irish - drove back their opponents but broke
The farm and allied left - Bart screened the farm with his skirmishers and crossed the stream to its right with 2 battalions while holding 2 battalions back as a reserve.  We countered by moving 2 battalions from our right wing reserve brigade to engage them.  Our other battalion of the Irish legion charged and after 2 rounds of melee broke a Portuguese battalion.  They then engaged the other forward Portuguese battalion in a long indecisive fire fight.   With the game running down the reserved Portuguese battalions attacked the French infantry holding the farm but were held in a drew.

Portuguese flanking move across the stream....
The allies lost 3 battalions and a cavalry regiment whilst the French lost 1 battalion and still held the line of the stream at the end of the game.  It was a great game - lots of moves and action in the 2 hours we took to play it. 
More photos and descriptions at
http://www.flickr.com/photos/bill26048/sets/72157631590385810/

Friday, September 14, 2012

Borodino - a bit of a fleche

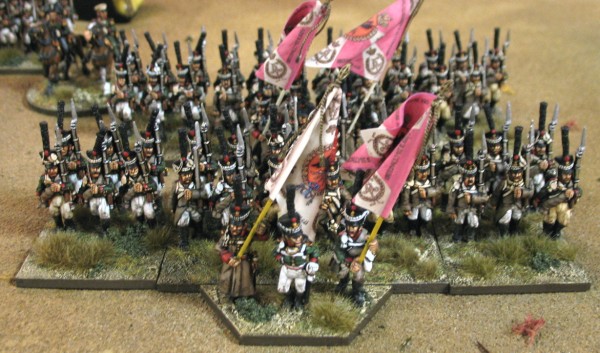
This weeks game at the SESWC was a long delayed Napoleonic game using the Black Powder Rules for Dave Imrie who had only used the rules in an AWI game previously.  It allowed Dave to put his impressive Russian Grenadier Division onto the table top.

Russian grenadiers...URRAH!
The Setup
The game was fought across a 8ft by 6ft table. We used the 66% movement and range version of the rules.  The table represented part of Borodino near the Bagration fleches which we represented with 2 redoubts.

The terrain on the table was open ground except for woods lining the southern edge of the table.  The Russians had 2 brigades each of 4 battalions of grenadiers and a cavalry brigade with a large cuirassier regiment and a Don cossack regiment.   Dave deployed a grenadier brigade around each of the fleches/redoubts with the cavalry split between the flanks.  A battalion and a gun occupied each of the redoubts

Garrison of a fleche - we counted them as 1 gun and a battalion
My French force comprised two 5 battalion infantry brigades each with a gun on the table with a chasseur brigade and a mixed curassier and lancer brigade in reserve of the table.

I made all the commanders 8s for this game. 

How the game played
Dave stood on the defensive and I threw an infantry brigade against each of the redoubts.  My initial attack on the redoubts proved a disaster as the first 2 battalions to charge in broke when suffering artillery hits.  Eventually I got a battalion to charge into the left hand redoubt but after 2 rounds of combat it broke and a supporting unit followed it from the field. 

Attack on a fleche - right hand unit broke to the artillery fire...
Dave had moved his cuirassiers to support his centre and I decided to attack them using my more numerous cavalry who had arrived on the table.  I ordered the chassuer brigade to charge and they blundered and retired from the table.  I immediately ordered the cuirassier lancer brigade to move to fill the gap left by the chasseurs.  They blundered and also retired from the table!  My dice were 6, 6, 2, 6, 6, 2.

The unfortunate dice - its a blunder of the table
This left me with 5 infantry battalions and 4 guns on the table.  Dave then decided to go over to the attack and charged 2 of my guns with his cuirassier regiment.  My guns scored 3 hits and the cuirassiers broke when they tested for the artillery hits.  That single success was the last action of the game……

It was a good game and took 2 hours to play.  The game was characterised by amazingly poor break tests dice rolls, truly appalling musketry fire, very good artillery fire and  excessive blunder rolls!  Dave is away to build some more realistic fleches for a bigger version of the game....

Friday, September 7, 2012

Battle of the Yellow Sea 1904

My game this weeks at the SESWC was a naval game - the Battle of the Yellow Sea in the Russo-Japanese War 1904. Colin Jack supplied the 1/3000 models for the game and we used Angus Konstams 8ft by 6ft sea mat.

Bart and I commanded the Russian fleet of 6 battleships and 4 protected cruisers. Colin Jack, Mr Ray and Campbell commanded the larger Japanese fleet of 4 battleships, 2 armoured and 8 protected cruisers. We used the simple Perfidious Albion rules.

Russian Fleet
The action started with the Russian fleet engaging the Japanese battleships and the 2 armoured cruisers. The 8 Japanese protected cruisers arrived on the table later. Our early battleship advantage proved illusory as only 3 of our battleships had first class guns compared with all 4 of the Japanese - our other 3 battleships with their second class guns proved ineffective. The Japanese battleships generally also had heavier armour than the Russians.

Japanese fleet
In the long battleship action my flagship the Pobieda suffered most damage - losing a turret, suffered 2 engine hits, multiple fires and the conning tower with the squadron commander was destroyed. Our cruiser squadron steamed to delay the arriving Japanese protected cruisers but 2 of them succumbed to the heavier guns of the Japanese cruisers.

My squadron led by Pobieda....


Thursday, August 30, 2012

Partisan Warfare - some of the troops

I was on holiday near London last week and this week I will not get to the SESWC as I am attending a cultural event at the Edinburgh Festival. So instead of a game report I have put up some photos of the troops involved in the Operation Frankfurter partisan game.
 

Partisan company - Painted by Jack Glanville of Pioneer Miniatures.

 
Partisan heavy mg and demolition team -Painted by Jack Glanville of Pioneer Miniatures.


FAI armoured car used by the Security battalion - great resin model from Rolf Hedges/Bandera.

 
Ford Woody station wagon used by HQ of the Security battalion - resin model from Rolf Hedges/Bandera. link to site
http://www.rhmodels.com/16.html

 
Somua S35 used by the special tank unit. I bought them built but unpainted for a projected but then abandoned French Army and painted them in German service. Plastic model by Heller?

 
SS cavalry - who dismounted to retake the station. Painted by Jack Glanville of Pioneer Miniatures. SHQ models?

Friday, August 17, 2012

PARTISAN WARFARE - OPERATION FRANKFURTER 1942

This weeks big game was held Thursday.  It was a 20mm fictional anti-partisan game set in Byelorussia during 1942 played using the Rapid Fire rules.

Security battalion deploys under fire
Organising the game
The game was fought at Hugh Wilson’s house on a 12ft by 5ft table that Hugh had built for the game. I provided the scenario, some terrain pieces and the figures.   My thanks to Susanne for providing the refreshments.  There were 4 players and I umpired. Hugh Wilson and Colin Jack were the German players. Bart Zynda and Mr Ray Neal were the Soviet players. 


Partisans assault the station strongpoint - Urrah Tovarischii!

Stuka over the burning station

Link to Flickr photoset of the game with further descriptions
http://www.flickr.com/photos/bill26048/sets/72157631103154878/

Further down you will find the player briefings and OBs.

How the Game Played
The partisans deployed a brigade in each third of the table and then diced to see which piece of heavy equipment each of the brigades had.  The brigade at the east end of the table also received the 45mm AT gun and it was deployed to cover the road to the railway station held by the German railway guard company.   The Germans decided to deploy the Motorcycle battalion supported by the full Panzer kommando on the southern end of the road crossing the table. The Security battalion advanced from the north on the road to the railway station.  The Slovaks and Rona came onto the table on foot thru the woods at the southeast side of the table.  Finally their SS cavalry were placed in the first supply train to come down the railway line from the west. 

Mixed panzer kommando moves forward
The roads were treated as cross country terrain for movement - the only vehicles allowed in the woods were the partisan horse transport.  Partisans only deducted a D3 for movement thru the woods as they knew all the secret paths.

At the east end of the table the Slovaks advanced onto the table and at once met a partisan brigade HQ and a company who delivered ineffective opportunity fire.  The company was destroyed in 2 turns and the survivors of the HQ escaped towards their comrades attacking the station.  

The partisan brigade in the centre attacked the station.  Their mortar in one of its few good shots demolished the building setting it alight and then 2 companies of partisans attacked from the forest, crossed the barbed wire and assaulted the building.  They defeated the railway guard unit who fled and occupied the station. 
The Security battalion had its first truck destroyed by the AT gun and then suffered casualties from partisan Mg and rifle fire as they debussed.  They were saved by the arrival of a Stuka which attacked the partisan firing line.  They then moved on foot towards the station engaging the triumphant partisan garrison supported by the Stuka.  The supply train eventually reached the station and disgorged the hidden SS cavalrymen who on foot assaulted the station and recovered it from the Partisans.

Geramns take Kolkhoz 14 but not for long
The major German force, the MC battalion and panzers,  met some opposition as they entered the table but largely ignored it and pressed on up the road and then came under fire from Kolkhoz 14.  After a long struggle they took the farm and most of the column pressed onto towards the railway to drive to the station.  At that point the Cossack cavalry division arrived and recaptured the farm.  The Germans massed their armour against them but they  knocked out the German T34 with a well thrown petrol bomb.
T34 aflame from petrol bomb.....Mein gott!

With the recapture of the station and the partisans facing it in a weak state and their eastern most brigade dispersed by the continuing forest sweep of the Slovaks it was agreed to be a German victory.  We agreed that it was a good game that worked well - next time we need a few more special events.

Link to article on Bart's blog
http://asienieboje.blogspot.co.uk/2012/08/frankfurter-1942.html

PLAYER BRIEFING
BACKGROUND
The turning point in the development of the Soviet partisan movement came with the opening of the Vitsyebsk gate, a corridor connecting Soviet and German-occupied territories, in February 1942. The partisan units were included in overall Soviet strategical developments shortly after that, and centralized organizational and logistical support were organized, with the Gate's existence being a very important factor in assisting detachments on occupied territory.
In spring 1942, the concentration of smaller partisan units into brigades began, prompted by the experience of the first year of war.   The restructuring of the Partisan forces continued and by the summer of 1942, all the larger groups were well armed and supplied with ammunition. Their materiel included light mortars, light and heavy machine guns and some of the groups had antitank guns, a few had motor vehicles, and several operated reconnaissance cars.
The coordination, numerical build up, structural reworking and established supply lines all translated into greatly increased partisan capability.
Due to this on the 5th of June 1942 Army Group Centre launched a large-scale antipartisan operation, code-named 'Vogelsang', in the area of Bryansk, to clear the forests of Partisans and scattered Red Army units and to secure the rail lines and highways.   This game operation ‘Frankfurter’ represents a follow up action later in August that year.

GERMAN OBJECTIVES
Your objective is to eradicate the partisan bands within the area of the game.  Priority in particular should be given to the destruction of the partisan HQ and the destruction of their major supply base and any landing grounds.
During the game supply trains will still be running to schedule along the main railway line.

DEPLOYMENT
Only the railway guard coy can begin the game on the table.  They can occupy a small defended station on the railway line.
One company of troops can be placed on a supply train.
All other troops enter the table from the table edges.  Motorised units can only enter along the roads or the railway line.  Units deployed on foot can enter form any table edge. The armoured unit can be deployed by coys. 


Peaceful scene before the action over centre of the table
 GERMAN OB

MC BATTALION
HQ: 6 FIGURES SD250 CMD
COY: 8 FIGURES MC
COY: 8 FIGURES MC
COY: 8 FIGURES MC
COY: MMG, 81MM MTR, 37MM ATG, 75MM IG, 12 FIGURES, 3 TRUCKS
RECCE COY:  PANHARD AC

SECURITY POLICE BTN
HQ: 4 FIGURES    CAR
COY: 7 FIGURES TRUCK
RECCE COY: FAI AC

SLOVAK INFANTRY BTN
HQ: 6 FIGURES
COY: 10 FIGURES
COY: 10 FIGURES
COY: 10 FIGURES
COY: MMG, 3 FIGURES

ATTACHED UNITS
SS CAVALRY COY
8 FIGURES

OST VOLUNTEERS
10 FIGURES  TRUCK

RAILWAY GUARD COY
8 FIGURES

SONDERPANZER COMMANDO 23
HQ: PZ1 CMD
COY: 2 S35 TANKS
COY: PZ34 737(r)

AIR  SUPPORT - SPECIAL EVENT

View from west end of the table....
SOVIET OBJECTIVES
Your objective is to interdict the fascist operation of the railway line.  Priority in particular should be given to the destruction of locomotives and rolling stock.  Fascist troops and their collaborators should be killed.   Your HQ and supply base should be preserved.
During the game supply trains will still be running to schedule along the main railway line.

DEPLOYMENT
At the start of the game you have 3 partisan brigades operational.  One partisan brigade must be deployed in each third of the table.  The supply base, a landing ground suitable for the landing of gliders and light aircraft,  and the partisan HQ must be deployed in different thirds of the table.   Each partisan company contains a rail demolition team.
All other troops enter the table from the table edges or land by air.
You may have the support of the 4th Cavalry Division which has been operating behind fascist lines since the great winter offensive and also a Stavka reserve Paratroop brigade.

SOVIET OB
1ST PARTISAN BRIGADE
HQ: 5 FIGURES
COY: 7 FIGURES
COY: 7 FIGURES
COY: 7 FIGURES
COY: MMG OR ATR OR MTR, 2 OR 3 FIGURES (DICE FOR WHICH)

2ND PARTISAN BRIGADE
HQ: 5 FIGURES
COY: 7 FIGURES
COY: 7 FIGURES
COY: 7 FIGURES
COY: MMG OR ATR OR MTR, 2 OR 3 FIGURES (DICE FOR WHICH)

3RD PARTISAN BRIGADE
HQ: 5 FIGURES
COY: 7 FIGURES
COY: 7 FIGURES
COY: 7 FIGURES
COY: MMG OR ATR OR MTR, 2 OR 3 FIGURES (DICE FOR WHICH)

SUPPORT
COY: 45MM ATG, 3 CREW

SPECIAL EVENTS
4TH COSSACK CAVALRY  DIV
HQ:  5 FIGURES INCL ATR
REGT: 6 FIGURES
REGT: 6 FIGURES
REGT: 6 FIGURES
COY:  MMG, 3 FIGURES, TCHANKA

PARATROOP BRIGADE
HQ: 5 FIGURES INCL ATR
COY: 8 FIGURES
COY: 8 FIGURES

Monday, August 13, 2012

HOLLAND 1944 28MM ROE

This weeks game at the SESWC was a 28mm WWII game of an action in Holland in 1944.  Colin Jack supplied all the figures for this game.  I supplied the buildingsand the river.  Once again the  terrain mat we used for this game was a large sheet of faux (teddy bear) fur which gives the look of sunny wheat fields.

This platoon level action involved US infantry and Polish paratroops with some armoured support attempting to cross a defended canal bridge.   It was played on a 8ft by 6ft table using the Rules of Engagement rules. Ray and Isaac Neil commanded the US troops while Bart commanded the Polish paratroops.  Scott  and I commanded the German defenders.


German HQ with vital canal bridge behind - river by Last Valley
The composition of the forces, their armoured support, deployment and arrival times were generated randomly.  I was quite happy as the Germans ended up with a 2 squad  infantry platoon supported by a MG section, mortar section and a 75mm ATG.  In addition a Panzer IV was due to arrive on turn 3.

In the end the game turned into a fair disaster for the Germans.  We watched the allied advance - our hidden infantry holding fire except for indirect fire from the concealed mortar which proved completely ineffective.
Our Panzer IV arrived on turn 3 and immediately came under opportunity fire from the Cromwell supporting the Polish paras.  Bart rolled a 6 to cause a hit, a 6 to hit the suspension, and a 6 for effect which smashed the suspension and secondary explosions which caused the tank to brew up! 

Panzer IV burning....
We then opened up with our infantry but at that point Colin revealed that 2 squads of Dutch resistance fighters were hiding in the block of buildings which housed our HQ section and MG.  Campbell commanded these troops and they immediately fired and charged into hand to hand contact.  After a vicious fight they were broken but they reduced the HQ and MG sections down to 1 figure each. 


Dutch resistance in british uniform surprise the MG section
 On our left flank the US infantry supported by a Priest drove back one of our squads and the US troops succeeded in getting a line across the canal and used this to swim across.  At the same time another US squad simply ran down the main road supported by the fire of the Polish paras and crossed the bridge unopposed whilst my troops were engaged with the resistance.


Game over - US infantry rush the bridge unopposed
 At this note the game ended being declared a major allied victory.  Once again Rules of Engagement seem to work well for this scale of action.

Sunday, August 5, 2012

CLAYMORE 2012

So Claymore 2012 has been and gone.  Good to see so many familiar faces.   We had over 30 displays and PP games and 35 trade stands.  The show went smoothly.  Attendance up slightly with 700 paying attendees thru the door.  Even the weather was unexpectedly good.

Many thanks to all who attended, presented displays, manned the trade stands and to the staff of Telford college for their help.

Nice venue - we are back again next year.  So I hope to see everyone again in 2013.  I can take it easy now until next February when the trade invites go out.

More of my photos now with updated descriptions at

http://www.flickr.com/photos/bill26048/sets/72157630904251246/


Commended Viking game from the Iron Brigade

View of main hall over Durham's 54mm Brandywine game

Impressive terrain and troops at the League of Augsburg's  Borodino game

Best display - the colourful Independent Wargames Brigade's pirate game

View of Atrium over Falkirk's 28mm RCW game