Friday, May 25, 2012

Spain 1813 - Capitaine Gerard regrets.....

This weeks game was a fictional 28mm Napoleonic Peninsular War game played with Black Powder.


British cross the Puebla bridge...
The Setup
It was a Donald Adamson scenario involving his hero Capitaine Gerard in which a British Force (commanded by myself and Colin Jack) advancing from Vittoria encountered a French rearguard force commanded by Hugh Wilson. The player briefings and orders of battle are given later. Donald provided most of the troops with myself provided the Puebla Bridge guard. The terrain set-up was provided by Hugh Wilson on his 12 ft by 5 ft table.
All the troops used the standard factors in the rules. The French infantry were reliable in attack column and the line British infantry had first fire. Veteran units were given the Crack special rule. We used the alternate move sequence with firing occurring after initiative moves.  Player briefings, scenario events and OBs are at the end of this article.  A map and more
photos with descriptions on flickr at
 http://www.flickr.com/photos/bill26048/sets/72157629888842166/


How it Played
My British infantry brigade advanced onto the table along the Royal Road while the flanking Light Brigade played by Colin came onto the table in the first turn just south of the Sacramento River. This meant that the 2 French reserve brigades could act immediately against Colin’s isolated force. The main action and excitement in the game resolved around this apparently unequal struggle.
The French attacked the Light Brigade initially with 4 battalions who closed quickly with the British and went in with the bayonet. Three of the French battalions were broken in the hand to hand conflicts (not much you can do when you roll 2 for the first break test and 4 for the supporting unit.) while the other battalion retired shaken and disordered.


First French attack goes in - En Avant mes amis...

A second wave of attacks by the French broke the British light infantry and a combined battalion but both the French battalions were broken by firing and fled the field. This left the French artillery and 2 battalions including the Royal Guard engaging the similar sized surviving force of the Light brigade from long range whilst the Swiss battalion had moved to the Los Mission Dos Putas Ridge as a distant support for the Puebla Bridge guard.
On their front the Bridge Guard had concentrated on the north side of the Puebla River. They allowed enough space on the north bank for the British to cross with 3 of their large battalions. The leading British battalion proved to be very poor shots - scoring 2 hits with 12 dice at short range - so the French held their position. Only as the game was ending did the British manage to redeploy to get 2 fresh battalions into action but their first volley of 10 dice proved ineffective! The cavalry brigade had by now crossed the river but never got into a position to unsheathe their swords.

French Bridge guard holds British....
The game ended when the Light Brigade making use of their horse gun and the superior range of their rifles broke both the French infantry units facing them in a single turn. Heavily outnumbered though they were they had broken 7 French battalions for the loss of 2 of their own. True hearts of oak…..
With the Royal Road cut behind them the French survivors would have to make their way cross country towards the beckoning Pyrenees.

British masses across the Puebla Bridge

French Briefing: General de Division Le Pard
It is 1813, and the British, Portuguese and Spanish are pushing north for the mountains and border with France. The French are fighting a glorious and bitter rear-guard campaign.
Your orders are to hold two key bridges over the Rio Puebla, and then over the Rio Sacramento. Your duty is clear.
You have positioned a small force, of two battalions, around the bridge over the Rio Puebla, together with your aide, the gallant Capitaine Gerard. They are ordered to hold the bridge until reinforcements arrive, which will be summoned by Capitaine Gerard.
Your main force is camped just south of the Rio Sacramento, east and west of the road by the bridge. You are clear that the Rio Sacramento not fordable for many miles. You are less clear about the nature of the Rio Puebla, and have therefore astutely retained your forces by the bridge over the Sacramento, until Gerard informs you of the position. You then plan to move forward to save the day when you know what threats you are facing. You will do nothing until you hear from the gallant Capitaine.


French OB
CinC Generale Etienne Le Pard 8

Brigade Auberge 8
Battalion of King Joseph’s Guards – small; veteran
Infantry de Griswald (Swiss) - veteran
34th Ligne
66th Ligne
Ft gun

Brigade Foix 8
16th Legere - veteran
23rd Ligne
29th Ligne
88th Ligne

Ft gun

Brigade Gris 8 at the Puebla Bridge
44th Ligne - veteran
46th Ligne - veteran


French Special Event
On reaching the house of the Fallen Women, Capitaine Gerard throws a dice.
1. Two of the whores offer themselves to the bold Gerard. Delay of D6.
2. One husky beauty leads the Capitaine to a boudoir. Delay of D3
3. Rides on next turn
4. Rides on next turn
5. Charms on the ladies with his ready wit. She tells him that a shepherd has reported a British force at point x on the map.
6. Having written a love sonnet to a dusky eyed beauty, she tells Gerard not only where the British are, but also the exact composition of the force.


British Briefing: Major General Hope
It is 1813, and the British, Portuguese and Spanish are pushing north for the mountains and border with France. The French are fighting a bitter rear-guard campaign.
You have an opportunity to punch through what your Spanish allies tell you is a thinly defended sector on The King’s Road – the royal road to France. Your orders are to seize two key bridges over the River Puebla, and then over the River Sacramento. Your duty is clear.
You approach from the south with one brigade under the somewhat foppish Brigadier Nicholas St Aubyn. The brigade is newly sent out from England with four fresh battalions. It is accompanied by a cavalry brigade of two regiments of dragoons, and a battery of foot artillery.
You have been informed by your Spanish allies that the Puebla River is crossable by ford a few miles to the west and east of the bridge. Unfortunately the Sacramento River is deeper and faster flowing, and thus not crossable for many miles. You send a brigade of light infantry and rifles under the irascible Red Rob Crawford on a flank march. The regiments are veterans but are supported by two line battalions that have been badly mauled in previous engagements and now form two composite battalions. They are accompanied by a troop of Royal Horse Artillery.


British OB
CinC Major Gen John Hope 8

Brigadier Nicholas St Aubyn 7
1st Foot (Royal Scots) - Large. Blue facings
28th Foot (Gloucestershire Regt) – Large. Yellow facings
31st Foot (East Surreys) –Large. White facings
37th Foot (Hampshires) – Large. Yellow facings


Brigadier Robert Crawford 9
60th Rifles - veteran
52nd Light Infantry – Small -veteran
1st Composite – veteran; 1 casualty
2nd Composite – veteran; 1 casualty

RHA gun

British Special Event
Before the game starts, the British throw a D6—this determines in how many turns the Light Brigade appears.
The British throw another D6. This determines where the Light Brigade appears between the two rivers.
East side of Board
1. Near (South) of ridge
2. On ridge
3. Far (North) side of ridge
West wide of Board
4. Near (South) of ridge
5. On ridge
6. Far (North) side of ridge
On throws of 1 or 4, the troops do not have to be put on table until they either go onto the ridge or go through the woods towards the bridge.
e

Sunday, May 20, 2012

Somewhere in Manchuria 1930s 28mm T&T

This weeks game at the SESWC was something different - a 28mm Sino-Japanese War action.
Manchurian train with its railway guard troops.
The troops and scenario were supplied by Colin Jack. The action involved the ambush of a Manchurian Railways armoured train by a small force of Chinese regulars. A second larger force of lower quality Chinese troops aided by local bandits took up position in a nearby village through which any relieving Japanese force would have to come.


Chinese bandit cavalry wait to pounce...
The ambushers had the better luck during the initial exchanges of fire and when the relief force of Japanese army and naval infantry arrived in front of the village they also suffered heavy casualties. Later the luck began to favour the Japanese who launched a series of Banzai bayonet charges on the Chinese troops holding the buildings.

Type 89 supports naval infantry
Eventually the Chinese tried to assault the train but the Japanese defenders held on. Elsewhere, the relief force were sweeping through the village but their Type 89 medium tank was attacked by an improvised Chinese anti-tank weapon which scored a hit on the motor.

Chinese Mk1 anti-tank waepon in action.....is it a rickshaw or a wheelbarrow?
Victory was awarded to the Japanese players. We used the Triumph and Tragedy rules which gave a fast, fun game.

Sunday, May 13, 2012

2nd POLOTSK - 18TH OCTOBER 1812

This weeks big game was held on Saturday.  It was a 28mm refight of the 2nd Battle of Polotsk 18 October, 1812 played using Black Powder Rules.


swiss brigade defends the convent
Organising the game The game was fought at Hugh Wilson’s house on a 14ft by 5ft table that Hugh had set-up for the game. I provided the scenario and the figures.   To get the game to fit into the space available we used the battlefield from our 1st Battle of Polotsk but with 2 redoubts added to the French deployment area.  My thanks to Susanne for providing the French style lunch.
Their were 6 players and I umpired. Hugh Wilson, Dave Paterson and Olivier Lepreux were the Russian players. Ian Carter, Colin Jack and Jimmy Conquer were the French players.  I have added a special 2nd Polotsk page which gives more complete information on the game set-up, terrain map, rules used, the player briefings and order of battle.

Link to Flickr photoset of the game with further descriptions
http://www.flickr.com/photos/bill26048/sets/72157629698341158/

SetupI based the OB on the troops I had available taking into account the proportions at the actual battle with the Russians having an infantry superiority, an extra cavalry brigade and more artillery.  The French army deployed with 4 infantry Brigades on the table with the heavy and light cavalry brigades and a Bavarian Brigade in reserve of table. The Russians deployed with 5 infantry brigades and their Cossack cavalry brigade on the table with the two combined Dragoon/Hussar  brigades in reserve of table.


View of the Russian centre with left wing beyond the stream

With the table effectively split into 2 sections by a stream running across it before the game started the 2 sides had to decide on which flank of their armies their reserves would be committed. The French command decided to commit their reserve light cavalry brigade on their right flank whilst the heavy cavalry brigade would support their centre. The Russian command decided to commit their 2 reserve combined cavalry brigades on their left and in the centre.
Terrain map with initial deployments - underlined units of table

These decisions left the Russian left with the  militia/depot infantry brigade, combined cavalry brigade and the Cossack brigade facing a French force of  their best Swiss infantry brigade and the light cavalry brigade. The Russian centre-right with 4 infantry Brigades and a combined cavalry brigade facing 3 infantry brigades supported by a heavy cavalry brigade.   The Russian plan was to attack in the centre towards Polotsk with 3 brigades plus cavalry whilst the brigade on the right covered this attack.  On the left their plan was to hold back with their militia brigade and harry the French with their Cossacks.  The French plan was to hold  defensively based on the line covering the convent, the 2 redoubts and the town of Polotsk.  At least that is what the French CinC Ian thought was the plan.

How the game played
On the Russian left beyond the stream the Russian militia brigade occupied a village whilst the Cossacks harried the Swiss based near the convent.  These tactics and the appearance on table of the combined cavalry brigade held the Swiss at bay.  They and the militia never exchanged a musket shot all day.  The French light cavalry eventually put in an appearance and engaged the Cossacks.  One Chasseur Regt retired from the field almost immediately - shaken so it could not return.  The other regiment broke a sotna of Cossacks and sweepingly advanced into the second sotna.  Amazingly the stationary Cossacks won the melee and forced the Chasseurs to retire from the field shaken so they could also not return.  The Cossacks did not have much time to celebrate their victory as they were broken on the next French turn by canister fire from the French horse artillery.  The Russian combined cavalry brigade had appalling command rolls and only achieved one positive action in forcing a Swiss battalion into square.

Cossacks drive back the Chasseurs a Cheval
On the other side of the stream the Russian juggernaut moved into action.  The right wing brigade quickly occupied the village on the river road and brought their artillery to bear on the French centre.  They were engaged at long range by the artillery from the Bavarian redoubt on the French left.

Bavarian redoubt opens fire
 The Russian centre left brigade moved slowly against the foreign brigade around the 2nd French redoubt.  Constrained into the gap between the redoubt and the stream the foreign brigade lost the Neufchatel and Josef Napoleon battalions to effective Russian fire only leaving the 2 battalions of the Irish legion holding on at the redoubt.

Foreign brigade moves forward briefly.....
Two Russian brigades supported by the reserve artillery and the combined cavalry advanced on Polotsk - it was the main attack.  To their surprise the French brigade holding Polotsk advanced to meet them supported by a regiment of cuirassiers.  The massed Russian artillery broke 2 battalions quickly and though the Cuirassiers forced the White Russia hussars to retire they were then broken by massed artillery and musket fire.  This left only 2 battalions, the lancers from the heavy cavalry brigade and their supporting guns to hold the Russian advance on Polotsk.

Russian masses move forward....
The French infantry had some success in melee breaking the Pavlov grenadier battalion - the best quality Russian infantry unit.  The lancers forced 2 Russian battalions into square  and one was broken by canister fire.  The other brigade became shaken and the lancers charged home on it.  The melee was drawn - the shaken square held on its break test while the lancers broke and fled the field.  The Russians broke the 2 infantry battalions - but the struggle for the town continued as Bavarians from the left flank moved into the town and some battalions from the reserve Bavarian brigade also arrived.  This did prove enough to hold the Russians and it was clear that they would take the town.

Twilight success - Bavarians storm Dvina village....
The Bavarians who had held the French left flank in the last turns decided to attack the Russian right flank brigade and in the gathering twilight managed to storm the village the Russians had occupied at the beginning of the game.  

It was agreed at the end of the game that the Russian successes in taking the town and in only  losing 5 infantry/cavalry units to the French 10  gave them a clear victory.  However the  late Bavarian success on the left at the river would enable the Franco-Bavarian army to successfully retire west across the pontoon bridges over the Dvina.  Excluding the lunch period it took us just over 5 hours to play out the game.

Thursday, April 26, 2012

Napoleonic Reinforcements

I did not get to the SESWC this week and I am away on holiday next week to the south of France so no new games to report for 2 weeks.  As I said before I have 3 main projects at the moment - continuing to add units to my AWI collection, building up my Russian and French forces for the 200th Anniversary of the battle of Borodino in 2012 and also a long term project for a Prussian Army to help out in the 1813-14 anniversaries.

Firstly here are some new staff for my French army. The figures are by Perry - set FN14 Generals of Division - Jerome, Quiot and Marcognet - each with a figure from set FN55 Mounted and Dismounted staff officers. They were painted by the great team at Reinforcements by Post in Bangladesh.

Prince Jerome Bonaparte - trying to find his command

Quiot of 1st Corps in 1815

Marcognet of 1st Corps in 1815
Here are some recent additions to the longer term Prussian  project.  I have added units of East Prussian and Silesian line infantry and East Prussian Landwehr. I bought the figures from South Africa on ebay. I have added some Games Workshop wash to their flesh, matt varnished them and rebased them to match my other units. The flags are from Warflags - which I think is a great free site.  The MDF bases are from Warbases and the Silflor tufts were supplied by Mutineer Miniatures. Here are 3 photos.


East Prussian Line
  
Silesian Line

 
East Prussian Landwehr with distinctive red Eagle flag

I have a large game planned for 12 May after my return.. All I know at the moment is that it will be 28mm Napoleonic. The details I will work out on my holiday.

Saturday, April 21, 2012

WWII - Two Soviet Disasters - 20mm and 28mm

The last two weeks games that I played at the SESWC have both been World War II actions - the first in 20mm and the second in 28mm - both proved complete disasters for the Red Army.


Panzer IVs move forward on German right flank
Last weeks game RapidFire 20mm was based on the Mokre 1944 scenario from the excellent WWII site by Bob Mackenzie.
http://homepage.ntlworld.com/bob_mackenzie/index.html

I adapted the scenario for the forces that myself, Colin Jack and Bart Zynda could provide.  Colin and Ian who was visiting for the first time commanded the German attackers - the appropriately named Kampfgruppe Collin and Bart commanded the Soviet forces.  I umpired.

Early and rare Soviet success as a Panther explodes
The scenario is set during the German counterattacks on the Sandomierz bridgehead over the Vistula with a battle group of 16th Panzer division attacking the lead  elements of the 6th Soviet  Tank Corps whose reserves steadily reinforce the front line.

Bart had a tank Brigade and its tank riders on the table at the start and was quickly reinforced by a rifle battalion and another tank brigade.  Bart deployed his initial forces on his right flank.  Colin split his attacking forces with the Panzer IVs and Panzer grenadiers on his right wing and the Panthers supported by a King Tiger and Stug III on the left.

Panzer IVs lead advance past Mokre....
Barts armour was deployed so it could not carry out opportunity fire but in his first turn his IS2 knocked out a Panther and that caused the rest of Panther company to retire of the field.   Ian brought on the King tiger and it started to engage the Soviet armour.   On their right the Germans advanced quickly and occupied the village of Mokre and got to the edge of the table stopping any Soviet reinforcements arriving on that flank.  Bart reinforced by his second tank brigade decided to launch his armour in an attack on his right.  Unfortunately he had forgotten that the Panthers would return and they and the KingTiger supported by long range fire from the Panzer IVs annihilated the Soviet armour. 
When we ended the game none of the Soviet tanks were operational and they had only knocked out the initial Panther and a Sd251 75mm support vehicle.

End game - a mass of destroyed and damaged armour....
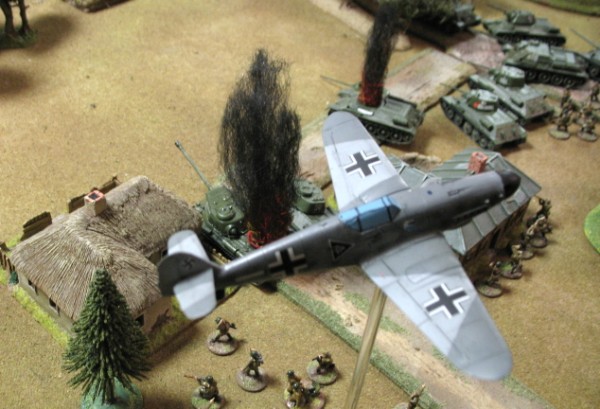
The Luftwaffe was strangely active - their BF109 effectively strafing the Soviet infantry and driving of the late arriving Yak-9.


BF109 flys over mounting Soviet disaster
You will find more photos and descriptions of this action on my flickr site at
http://www.flickr.com/photos/bill26048/sets/72157629477311262/

This weeks game was a 28mm Winter War scenario that Colin devised using the Triumph and Tragedy Rules.

Soviet troops parade before action - Za Stalina!!!
Colin and I commanded a Soviet force advancing over windswept snowy terrain towards the distant Finnish village of Talvisota.  We had the more numerous troops - 6 large units of Red army Infantry supported by a BT7 tank.  Sadly I had to dice for the quality of the troops and 5 of Soviet units were raw!  The Finns had one less unit and all their units were smaller.   Importantly they were far higher quality than the Soviets, they had 2 MGs and they were hidden in the trees in the flanks or in the village.

Urrah Tovarischii - the advance begins.....
The Soviet infantry made  2 advance moves and then came bogged down in a firefight with the ambushing Finns.  The raw infantry were repeatedly pinned by MG fire and steadily  broken apart.  The raw BT7 heroically tried to save the day but ended as a bullet riddled wreck, 2 crew eliminated, motor hit, track damaged, turret jammed, main gun knocked out.  The last lucky crewman surrendered.  With all 4 raw units fleeing the field the day was certainly the Finns.  Once again MGs and superior troops showed their superiority over masses of raw conscripts.

Finns observe the dark Soviet masses....
Bart has written up both of these games on his English/Polish language blog
http://asienieboje.blogspot.co.uk/

Friday, April 13, 2012

AWI BLACK POWDER - PETERSBURG 1781

I arranged a Black Powder game at Hugh Wilsons for the Easter break for our old friend Scott Duncan who was due to visit us from London - in the end Scott could not get away from his job so myself, Hugh Wilson and Dave Paterson played the game.
The game was based on the Battle of  Petersburg Virginia on 25 April 1781 with the orders of battle adjusted to fit with the troops that I have available.

The game was a further use of the amended turn sequence which has been proposed in the “& Blenheim” rule modifications by Ian Hopping available on the Yahoo BP Forum.  All the photos of the game are on my flickr site at.
http://www.flickr.com/photos/bill26048/sets/72157629798698679/


View from behind Petersburg - militia massed on the turnpike
Some History
The Battle of Petersburg was a battle of the American Revolutionary War that took place on 25th April 1781 in Virginia.  A Patriot force of 1200 men led by General Von Steuben made a stand against a raiding force of approx 2,300 under General Philips which was moving thru Virginia pillaging and plundering.

The outnumbered Patriots fought a successful delaying action for 3 hours before withdrawing thru  Petersburg and using Pocahontas Bridge to cross the Appamattox River.  The British Loyalist Brigade was commanded by Benedict Arnold.

The Setup
The game was fought down a 10ft by 5ft table. We used the standard movement and ranges given in the rules.  The 24 figure units were classed as standard units and the 10 to 16 figure units as small units.

I made all the British commanders 8s for this game whilst on the Patriot side Von Steuben was an 8 and his Brigadiers were 7s.
The British regulars had the usual Special rules from the Freeman’s Farm scenario ie Crack, Steady and First Fire, the small units of Highlanders were rated Grenadiers and so had higher HtoH dice and stamina, and the Virginia State troops and the Loyalists were vanilla units but with First Fire and the militia were Unreliable and had only 5 HtoH dice and a morale save of 5+.

Hugh Wilson commanded the Patriot Army and Dave Paterson the British Army whilst I umpired.

British line forms - loyalists on left highlanders and Hessians on the right
Player OB and Breifing

Major General Philips
You have been ordered by General Clinton to take an independent command and to raid into Virginia to destroy  and seize any military supplies and stores of tobacco.  This action will also disrupt the LOC to the rebel army in North Carolina. You arrived by sea 2 days ago and have begun your march towards Richmond.  Your scouts report that the rebels are preparing a stand east of the small town of Petersburg.

Brigade of Col Simcoe
71st Highland          16 figures
42nd Highland         16 figures
Jaeger detachment   12 figures
Artillery                   Gun & crew

Brigade of  Lt Col Dundas
4th Line                  24 figures
5th Line                  24 figures

Brigade of BG Arnold
Loyal NY Regt       16 figures
Loyal Phil Regt       16 figures
Queens Rangers     10 figures
Artillery                  Gun & crew


Riflemen open the action - main body behind - in distance mil sk move up to cover the far right flank
 Major General Von Steuben
You are in command of the Patriot forces in Virginia.  Two days ago you received word that a British force had landed from New York.  The are on a raid to burn and pillage thru Virginia and are now approaching Petersburg with it’s important tobacco warehouses moving on Richmond.  You have mobilised the state troops and these and a county militia are the forces available.  You have put your command into a defensive posture and sent a courier to other counties requesting support.

Patriot OB
Virginia State brigade   MG Muhlenburg
1st Regt                   24 figures
2nd Regt                  24 figures
3rd Regt                  24 figures
Rifle detachment      12 figures
Artillery                   Lt Gun & crew

Petersburg County brigade BG Goode
Militia battalion        24 figures
Sk detachment        10 figures
Artillery                   Lt Gun & crew

How the game played
The Patriot army deployed with the Virginia State Brigade in a defensive position  defending the line of Poors Creek and the Militia brigade held back in reserve in Petersburg.  The British initially had 2 Brigades on table - Arnold deployed on the left of the turnpike and Simcoe marching on the road.  Dave quickly moved Simcoe to the right of the road to investigate a farm and deploy forward with Simcoe.  The Patriots deployed the militia from Petersburg as a 2nd line but sent their skirmishers and light gun forward to reinforce the main line.

The action opened with the riflemen on the Patriot left engaging in a duel the  Hessian Jaegers.   On the British side Dave decided to act first with his Loyalist troops on the left by crossing the creek and attacking farm no 2 held by a unit of state troops supported by a light gun.  The Loyalists screened by the Queens Rangers crossed the Creek and for a time were held up by the Patriot fire but eventually after the Rangers flanked and broke the patriot light gun with their fire the 2 formed units charged the Patriots holding the farm fence line.  The Patriots broke one of the units in the first round and the melee continued.

State troops hold Loyalists whilst Regulars move up in support
On the British left the Highlanders failing to find anyone at farm no 1 simply set it alight and then crossed the creek to engage the state troops holding the flanking wood.  Luckily for them it proved to be the property of a staunch patriot.  Patriot fire broke the Jaegers who fled the field.

Regulars march past unconcerned as Highlanders burn farm number one...

Eventually the 3rd British Brigade arrived and rushed up the turnpike but the 4th of Foot in the van was stopped on the bridge over the creek by repeated disordering hits.  Accordingly the 5th foot deployed to the left to support the Loyalists.

The state troops at farm no 2 eventually also beat back the remaining loyalist unit who retired back over the Creek.  These heroes of the revolution were then charged by the British regulars of the 5th Foot who won the first round of combat so forcing the fence line and in the next round they broke the exhausted state troops who fled to Petersburg.

Climax of battle for Farm No 2 as the 5th push across the fence line - hurrah!
On the Patriot left the Highlanders supported by the RA broke the flanking Lt gun and Patriot riflemen and drove of the militia skirmishers leaving the State troops holding the wood unsupported so that they were driven from the wood and then broken by massed fire.

This was the last action of the game as night fell - it was turn 12.  The British had not got near to Petersburg in the day but for the loss of 2 units they had broken 5 Patriot units out of 9 and burnt a farm so I declared the game a British tactical victory.  We did not have a single command blunder in the game.  I am thinking of using this game as a starting point of a mini campaign of linked games using some of the ideas in the LAOK Jacobite 45 Rising campaign.

Dave  Cooper of VolleyfFireWargames suggested the scenario to me and I adapted some rules on Pillaging and Burning farms that Dave had been given.  This is my BP version of them.
To determine loyalty of the owner of a farm or building....A BDE, DIV or Army  leader must be within 6” of the home. Then pass a Command Check (knock on the door) If the Command  Check is passed roll a dice. Odd Rebel or Even Loyalist…if rebel they can they try to pillage and burn!   Only one loyalty test can ever be undertaken for each property
If the Command  Check is failed they can try to pillage and burn then roll to test loyalty! If they burn a loyalist farm...OOps sorry about that you unfortunate colonial!  VP points go to Rebels!
To burn a farmhouse or field a Command Stand (Flag or leader of skirmish) must be next to the target and pass a Command roll to set fire.

Sunday, April 8, 2012

28mm SYW - Playtest of Maurice Lite

This weeks game at the SESWC was again something new for us. A 28mm Seven Years war game using the Maurice Lite rules by Sam Mustapha. Angus Konstam had returned from Orkney via Minneapolis and we decided to give the rules a test outing.  We threw together a simple scenario with Angus French force of 2 infantry brigades each of 4 battalions, a cavalry brigade of 2 Hussar regiments and 2 guns attacking my Hessian force of 2 brigades totalling 7 infantry battalions, a British Light Dragoon regiment and 2 guns.

My artillery open fire on the Hussars

I advanced my Right wing infantry brigade of 4 battalions whilst my weaker Brigade of 3 battalions on the left wing supported my battery of 2 guns. Angus advanced all of his force but his guns never got into action being screened by his advancing infantry.
On the French right the French Hussars advanced on my weaker Brigade but they were bombarded by my artillery. Eventually they got into a position were both regiments charged 2 of my battalions. The cavalry won both actions but not enough to break the infantry and had to fall back. My infantry then volleyed them causing more disruptions and Angus at his next turn withdrew them to safety out of my musket range.

Hussars recklessly charge home - they won but not enought....


On my right Angus infantry came into action against my stronger brigade and a long musketry duel developed. The highlight was when I played an Event card forcing Angus Irish Wild Geese battalion who were getting the worse of the fire fight to charge one of my battalions. Once again the attacker won but not enough to break my battalion and they withdrew with 4 disruptions. My next volley took them over their disruption level of 4 and the Irish broke. The fire fight continued and at the end of the game we had both lost 2 battalions.

The ongoing infantry battle - we both lost 2 units...


The rules worked but Angus and I both have severe doubts about the command mechanism.

Like Lasalle the game mechanisms are relatively simple and very well explained in even the free LITE version of the rules - available at
Add link here

Firing is very similar to Lasalle. The basic close combat system is simpler than even Lasalle. One notable feature of the game was that every attacker won their close combats but by never enough to break their opponent. If they had won decisively they would have automatically broken their opponent. A simple win inflicts 2 disruptions on the loser - this if it takes them over their disruption level it will break them. The winner suffers 1 disruption and if their opponent has not broken must withdraw. The hand to hand factors in Lasalle worked by adding/subtracting dice from each side - so troops with an advantage rolled more dice than their opponents. The difference in the number of hits from the dice determined victory and its level. In Maurice only a single dice is thrown and this adjusts a numeric combat value with modifiers the total of which is compared for the 2 sides to determine victory and its level. I must admit I prefer the multiple dice system to a system reliant on a single dice roll.

My main reservation is about the command mechanism - the key to this game and what makes it different - which in a player turn limits a player to doing 1 basic action with one force. A force in Maurice is a contiguous group of similar units in the same formation. A force is not a fixed brigade. These actions are march, bombard, charge, rally, pass or play an event card plus you can always volley fire. The problem with this system is that you can be left with part of your army not in action or unable to move/charge for long periods due to the priority you as the commander have to give to another part of the action.

The card deck you hold and can play allows you to improve your options or impact your opponent - e.g. +1 to every rally attempt, +2 to every unit in a force defending. There are good ideas in the card deck that I would use for special events with any set of rules.