Showing posts with label Triumph Tragedy. Show all posts

Saturday, November 17, 2012

RUSSO-JAPANESE WAR 1905

This weeks game at the SESWC was a 28mm Russo-Japanese War game.  All the figures for this game were supplied by Colin Jack who also developed the scenario and acted as the umpire.  The game gave us a chance to try out Colin's expanding collection of Tsuba Miniatures Japanese infantry.


I commanded a Japanese force pursuing the retreating Russians.  Bart Zynda commanded the Russians as there may have been some Poles amongst them.  See the player briefing below.   We both split our forces to cross and cover the river at the 3 points A, B and C.  Bart and I then discovered that the table we were using only covered one of the these points and the battle would be fought where the most troops had been deployed.  It turned out to be at village C where I had deployed my weakest force of 2 trained battalions and the 2 units of Chinese auxiliary cavalry.  This meant that I was initially facing the strongest part of the Russian army.  The forces assigned to sectors A and B then appeared as reinforcements on the flank of the action.  Those in sector B could arrive in 1 to 6 moves those in sector A in 7 to 12 moves.


Chinese auxilaries lead the advance
Luckily for me the Russians were still marching back to the river and I managed to throw my 2 Chinese cavalry units over the narrow ford across the river followed by a trained infantry unit.  The cavalry delayed the Russian advance but both units were destroyed once they engaged in melee!   My infantry at the river came under heavy fire from the Russians who using their local numerical superiority had now occupied the village.  I reinforced them with the other trained unit.  My one piece of artillery arrived quickly from sector B and its accurate fire managed to break 2 of the raw Russian units on their right flank.  However both my units across the river were being worn down by surprisingly good Russian rifle fire and my first veteran infantry unit had only started to cross the ford when the game ended.


Skulking Cossacks......


Fatal charge into flank of the Cossacks....
So the end of the game saw the Japanese with a very tenuous bridgehead over the river held by the remnants of 2 trained infantry units.  If the Russians could launch an assault they would be able to drive us back across the river.

We used Triumph and Tragedy for this game.

An account from the Russian side is at Bart Zynda's blog at
http://asienieboje.blogspot.co.uk/2012/11/battle-of-ford-on-river-x-bitwa-o-brod.html/


End action situation - bridgehead under heavy fire...
JAPANESE PLAYER

Your march through Korea continues with the Russians steadily withdrawing before you.  You expect them to turn and make some kind of stand, perhaps at the River X.  You are maintaining contact with the retreating Russians using your Chinese auxiliary cavalry backed up by your own cavalry.
During the night, and a heavy rainstorm, contact has been lost but the advance continues.  On the basis of the following report from your cavalry commander you must decide how your advance should proceed.

"During the night, in low cloud and heavy rain, our scouts lost contact with the Russians. They are approaching the River X and there are three possible crossing points - a bridge at Village A and fords at Villages B and C.  It appears that the Russians may have crossed at all three points."

You have the following troops at your disposal:-
Infantry Battalion No 1    Veteran     10 rifles
Infantry Battalion No 2    Veteran     10 rifles
Infantry Battalion No 3    Veteran     10 rifles
Infantry Battalion No 4    Veteran     10 rifles
Infantry Battalion No 5    Trained     10 rifles
Infantry Battalion No 6    Trained     10 rifles
Infantry Battalion No 7    Trained     10 rifles
Cavalry Squadron No 1    Trained    5 sabres
Cavalry Squadron No 2    Trained    5 sabres
Chinese Auxiliaries A       Raw          5 sabres
Chinese Auxiliaries B       Raw          5 sabres
Artillery


RUSSIAN PLAYER

You have been steadily withdrawing before the inexorable Japanese advance.  Your Cossack cavalry provides the rearguard and maintains contact with the leading elements of the Japanese force.  Thanks to a heavy overnight rainstorm, contact now appears to have been lost.
Orders from Army HQ demand that you halt your withdrawal and attempt to hold the line of the River X which you crossed yesterday afternoon.  The Japanese have not reached the river but their axis of advance is unknown.
There are three crossing points, a bridge at Village A and fords at villages B and C.  You must decide how to deploy your troops to halt the Japanese advance.

You have the following troops at your disposal:-

Infantry Battalion No 1    Trained     10 rifles
Infantry Battalion No 2    Raw          10 rifles
Infantry Battalion No 3    Raw          10 rifles
Infantry Battalion No 4    Raw          10 rifles
Infantry Battalion No 5    Raw          10 rifles
Infantry Battalion No 6    Raw          10 rifles
Infantry Battalion No 7    Raw          10 rifles
Cossack Cavalry A          Raw+          6 sabres
Cossack Cavalry B          Raw+          6 sabres
Cossack Cavalry C          Raw+          6 sabres
Cossack Cavalry D          Raw+          6 sabres
Line Cavalry                    Trained         6 sabres
Artillery                           Trained

Sunday, September 30, 2012

SCW OVIEDO 16 OCTOBER 1936

This weeks big game was held at Hugh Wilsons house on Saturday.  It was a Spanish civil War game based on the siege and relief of Oviedo in 1936.  It gave Colin Jack and I the chance to get our rarely used 20mm SCW collections onto the tabletop.  Colin Jack and I provided the figures, buildings and defences while Hugh Wilson provided the rest of the terrain.  I provided the scenario and acted as the umpire.  We used the Triumph Tragedy rules with an amended initiative system.  Thanks to Suzanne Wilson for providing us with a Spanish inspired lunch….

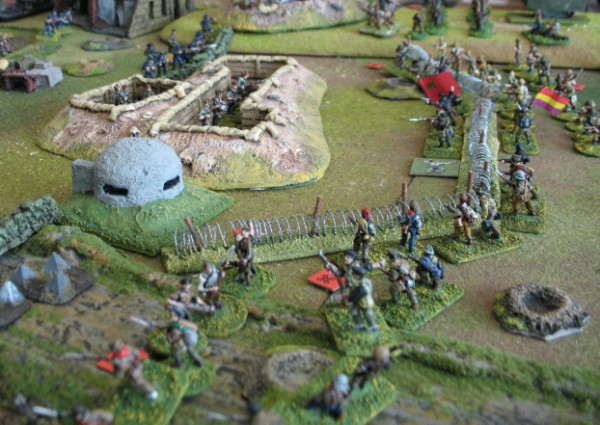
Oviedo and some of its formidable defences
Setup
The game was along a 14ft by 5ft table.  Oviedo and its defenders 3 under strength brigades occupied the last 3ft of the table.  The Nationalist relief column initially of 2 brigades with another 2 due to enter later was at the other end of the table.  The rest of the table was held by the Republican forces made of 9 brigades of anarchist, trade unionist and loyalist militia.
 
Dave Paterson played Colonel Aranda the commander of the garrison of Oviedo with Dave OBrien and Mark Taylor commanding the relief column.  Colin Jack commanded the republican blocking force of 2 brigades, while Donald Adamson commanded the main assault on the town with 6 brigades and Hugh commanded a diversionary attack with the weakest brigade on the Republican left.

Additional equipment, special characters and air support were all controlled by a set of chance cards of which we drew 3 or 4 each turn following turn 1.  Before the play started we drew 4 cards from a Republican subset to add some variety to the militia forces.  These gave the Republicans another 75mm gun, more dynamite bombs, an anarchist leader to inspire a brigade of the blocking force and El Toro - an improvised armoured tractor.

Militia at the wire...
How the game played

Around Oviedo
The Republicans attacked the left side of Oviedo’s defences with a massed assault by 6 brigades.  The brigades attacking over the open flat ground were initially stopped by the barbed wire and the effective fire of the Nationalist machine guns which pinned their raw troops.  The brigades attacking along the ridge at the edge of the table where there was no barbed wire succeeded in overrunning the left most entrenchment held by  a squad of falangists.  It was retaken almost immediately by a police squad acting as a reserve for the defence.   This success did not last for long as it fell again soon after to another militia brigade stiffened by some asaltos who had joined them (another chance card).   A socialist hero joined one of the brigades facing the wire and with the defences breached on the ridge the nationalist line was rolled up as the Republicans stormed over the wire. 
The diversionary attack on the right of the town by an under strength anarchist brigade succeeded beyond any expectations as it got thru the wire and routed the other falangist squad holding an entrenchment.  
The Nationalist commander withdrew his last surviving units from the outer defences into the town hall to make a last stand.    Only at that moment did some succour appear firstly in the form of a nationalist fighter which made a completely ineffective strafing run and secondly by the garrison managing to a refurbish a Trubia tank which rolled out of the barracks towards the town hall.   Things still looked very bad for the garrison…….

Last minute air support as El Toro creeps forward below..

Trubia speeds to support the last stand in the city hall
Blocking Action
The relief column started with the Galicia infantry and volunteer cavalry on the table.   They made steady progress against the militia who had been deployed in depth holding strong buildings.  The Galicia under Mark forced the militia unit holding the first hamlet on the road to flee and then when in the open they were ridden down by the cavalry under Dave O.  The Galicia then attacked the impressive church dominating the road from its hill.  As the Galicia fired at the church the militia defending it were suddenly attacked by a fifth column of priests, nuns, civilians and guardia who had been in hiding in the crypt.  (another chance card)  The clerics were defeated and surrendered to the militia.  One can only imagine their fate.   The volunteer cavalry overran the Republican gun supporting the blocking force and swept on further to overrun the gun supporting the attack on Oviedo.   Who dares say that cavalry has no future role in modern warfare.  The Galicia eventually stormed the church.  The motorised Legion 5th bandera arrived but its early advance was disrupted by a bombing raid by a Republican Potez bomber.  However they pressed on and supported by a FT17 that arrived they took the 2nd hamlet on the road.  At the end of the game their advance squad was approaching the last blocking position on the road.

Militia surrender to Volunteer cavalry

Volunteer cavalry overun the blocking force gun...
We declared the game a winning draw for the Republic - they had not quite achieved their objective of eliminating the garrison but with a mass of raw troops they had achieved more than anyone had expected.  Col Aranda (Dave P) blamed the relief columns obsession with capturing the church for delaying their advance on Oviedo.

5th column emerge from the crypt...Arriba Espana
More photos and descriptions at
http://www.flickr.com/photos/bill26048/sets/72157631652597178/

Here are the player briefing notes and Order of Battle for the game. 

PLAYER BRIEFING
Background
The Rebels did not consider Oviedo, capital of the province of Asturias, as a likely place for a successful right wing revolt, and initially it was considered a lost cause for the uprising. The town was the center of the Asturian October Revolution of 1934, and became an ongoing hive of revolutionary activity since the election of the Popular Front government earlier in the year.
The garrison commander Colonel Aranda was reputed to be a freemason and a Republican, and got along well with the local Republican officials; in addition, the Falange distrusted him.  Aranda declared that he would be loyal to the Republic when the rebellion started on July 17, and he convinced the civil governor and the union leaders that all was calm. So satisfied were the authorities that 4,000 miners left by train for other parts of Asturias and Spain to fight in the growing conflict. Aranda secretly called in Civil Guard and Assault Guard personnel from all Asturias to concentrate at Oviedo. He had gained a reputation in Africa of being a top strategist, and after the miners left, he declared for the rebellion on July 19. The Falange, Civil Guard, and Assault Guard immediately rallied to his side.
Aranda easily took over Oviedo as the republicans panicked, and the rest of Asturias became hostile toward him. Between the two large zones, east and west of Oviedo, Aranda was landlocked and surrounded in the town.  The Popular Front parties and their allied Anarchists began besieging Oviedo on July 20 but there was no serious action until after the fall of the Rebel holdout at Gijon in mid August. 
As the Republicans pressed their final attacks which had started on 4th October, the Nationalists held on grimly, ready to make their last stand. In the distance, they could hear the relief column of the Army of the North attacking. Help had arrived, but would it be in time?

Victory Conditions: The Republicans are the attackers. They must eliminate the rebel garrison before it is relieved. Nationalist must avoid conditions.

Nationalist Notes
Though well supplied with rifle ammunition ( a million rounds at the beginning of the siege) the garrison is running short of MG ammunition.  Its usage needs to be recorded.  The Nationalist player gets 6 d6 worth of bursts from MGs.

Republican Notes
Your forces are mainly made up of workers militia stiffened by a few Assault Guards who remained loyal.  You are mainly armed with rifles but the factories of the industrial zone are working on improvising heavier equipment for the siege.  The Republic’s airforce is active in the area and controls the sky.  It has been bombing Oviedo since September.  The rebels held up in Oviedo must be running low on supplies and it is known that typhoid has broken out in the city.

REBEL/NATIONALIST OB
THE GARRISON OF OVIEDO
Milan Infantry Regt
 2 squads of 10 figures TRAINED
 1 MG
Civil & Assualt Gds
 2 squads of 10 figures VETERAN
 1 MG
Falange/Volunteers
 2 squads of 10 figures RAW
 1 MG
Plus support
Field Gun      TRAINED
1 MG             TRAINED

ARMY OF THE NORTH - RELIEF COLUMN
5th Bandera of the Legion
 3 squads of 10 figures ELITE
 1 MG
Navarese Requetés
 3 squads of 10 figures VETERAN
 1 MG
2nd Galician Regulars
 3 squads of 10 figures TRAINED
 1 MG
Combined Cavalry
3 squads of 10 cavalry figures TRAINED
Plus
Battery of 70/19 mountain guns        TRAINED
Armoured car of the Assault Guards  TRAINED

LOYALISTS/REPUBLIC OB
1st REPUBLICAN Militia Column:
3 squads of 10 figures RAW (dice for MG on a 4,5,6)
2nd REPUBLICAN Militia Column:
3 squads of 10 figures RAW (dice for MG on a 4,5,6)
3RD  REPUBLICAN Militia Column:
3 squads of 10 figures RAW (dice for MG on a 4,5,6)
1st ANARCHIST  Militia Column:
2 or 3 squads of 10 figures RAW (dice for 2 or 3, dice for MG on a 4,5,6)
2nd ANARCHIST  Militia Column:
2 or 3 squads of 10 figures RAW (dice for 2 or 3, dice for MG on a 4,5,6)
3rd ANARCHIST  Militia Column:
2 or 3 squads of 10 figures RAW (dice for 2 or 3, dice for MG on a 4,5,6)
1st CNT Militia Column:
2 or 3 squads of 10 figures RAW (dice for 2 or 3, dice for MG on a 4,5,6)
2nd CNT Militia Column:
2 or 3 squads of 10 figures RAW (dice for 2 or 3, dice for MG on a 4,5,6)
3RD CNT Militia Column:
2 or 3 squads of 10 figures RAW (dice for 2 or 3, dice for MG on a 4,5,6)
plus
Battery of 75/27 field guns RAW

Friday, July 20, 2012

Sino-Japanese War 1938

This Thursday I went down to Colin Jack's place for a game in his wargames room with Dave O’Brien and Mr Ray Neal who was making a rare appearance from over the pond. This 28mm game was set in China in 1937. Mr Ray and I commanding a motley mixture of Chinese whilst Colin and Dave commanded the well equipped veteran Japanese.

Students hiding at the nomad yurts....

The scenario was set at the river mouth of a Chinese peninsula where a train commanded by Colin packed full of Japanese infantry were attempting to make their way down to meet up with a naval landing party commanded by Dave. Unfortunately for them our Chinese force didn't intend to let things go quite so smoothly so a mixture of regular troops and volunteer students had blocked the main line and set up a series of ambushes.

The considerable Japanese landing force at the other end of the table was a mixture of Marines and sailors backed up by a light gun, an Hmg and a tank facing a few units of poor Chinese troops supported ineffectively by an Hmg and a gun. These troops managed to delay the landing force who only had a single bridge to cross to the mainland.

The massive Japanese seaborne effort....

The key action was around the train. Under the Triumph and Tragedy rules we use the high quality Japanese troops should have had few problems facing the poor quality Chinese troops and especially the students. Luckily this had not been explained Mr Ray who launched his students in a series of charges against the halted train. I supported their attack with the fire of our only 2 trained Chinese regular units.

Students take the loco - Japanese veterans surrendered!

The students took the locomotive and then worked down the train defeating in total 3 veteran Japanese units in close combat. Defeating even one was a shock. Doing this meant that we managed to capture the whole train so winning the game.

The final highlight in the game and a rare success for the Japanese was when their plane arrived and shot down our Chinese fighter in a dog fight.  A fun game and Triumph and Tragedy worked well again. 

Japanese success in the air but to late to save the train....

You can find a report from the biased Japanese viewpoint at Daves site...
http://davestoybox.blogspot.co.uk/

Sunday, May 20, 2012

Somewhere in Manchuria 1930s 28mm T&T

This weeks game at the SESWC was something different - a 28mm Sino-Japanese War action.
Manchurian train with its railway guard troops.
The troops and scenario were supplied by Colin Jack. The action involved the ambush of a Manchurian Railways armoured train by a small force of Chinese regulars. A second larger force of lower quality Chinese troops aided by local bandits took up position in a nearby village through which any relieving Japanese force would have to come.


Chinese bandit cavalry wait to pounce...
The ambushers had the better luck during the initial exchanges of fire and when the relief force of Japanese army and naval infantry arrived in front of the village they also suffered heavy casualties. Later the luck began to favour the Japanese who launched a series of Banzai bayonet charges on the Chinese troops holding the buildings.

Type 89 supports naval infantry
Eventually the Chinese tried to assault the train but the Japanese defenders held on. Elsewhere, the relief force were sweeping through the village but their Type 89 medium tank was attacked by an improvised Chinese anti-tank weapon which scored a hit on the motor.

Chinese Mk1 anti-tank waepon in action.....is it a rickshaw or a wheelbarrow?
Victory was awarded to the Japanese players. We used the Triumph and Tragedy rules which gave a fast, fun game.

Saturday, April 21, 2012

WWII - Two Soviet Disasters - 20mm and 28mm

The last two weeks games that I played at the SESWC have both been World War II actions - the first in 20mm and the second in 28mm - both proved complete disasters for the Red Army.


Panzer IVs move forward on German right flank
Last weeks game RapidFire 20mm was based on the Mokre 1944 scenario from the excellent WWII site by Bob Mackenzie.
http://homepage.ntlworld.com/bob_mackenzie/index.html

I adapted the scenario for the forces that myself, Colin Jack and Bart Zynda could provide.  Colin and Ian who was visiting for the first time commanded the German attackers - the appropriately named Kampfgruppe Collin and Bart commanded the Soviet forces.  I umpired.

Early and rare Soviet success as a Panther explodes
The scenario is set during the German counterattacks on the Sandomierz bridgehead over the Vistula with a battle group of 16th Panzer division attacking the lead  elements of the 6th Soviet  Tank Corps whose reserves steadily reinforce the front line.

Bart had a tank Brigade and its tank riders on the table at the start and was quickly reinforced by a rifle battalion and another tank brigade.  Bart deployed his initial forces on his right flank.  Colin split his attacking forces with the Panzer IVs and Panzer grenadiers on his right wing and the Panthers supported by a King Tiger and Stug III on the left.

Panzer IVs lead advance past Mokre....
Barts armour was deployed so it could not carry out opportunity fire but in his first turn his IS2 knocked out a Panther and that caused the rest of Panther company to retire of the field.   Ian brought on the King tiger and it started to engage the Soviet armour.   On their right the Germans advanced quickly and occupied the village of Mokre and got to the edge of the table stopping any Soviet reinforcements arriving on that flank.  Bart reinforced by his second tank brigade decided to launch his armour in an attack on his right.  Unfortunately he had forgotten that the Panthers would return and they and the KingTiger supported by long range fire from the Panzer IVs annihilated the Soviet armour. 
When we ended the game none of the Soviet tanks were operational and they had only knocked out the initial Panther and a Sd251 75mm support vehicle.

End game - a mass of destroyed and damaged armour....
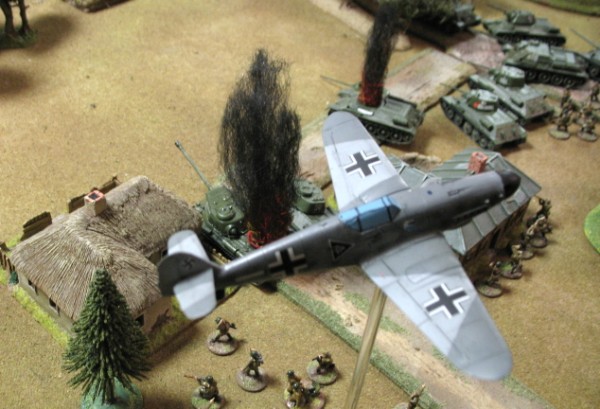
The Luftwaffe was strangely active - their BF109 effectively strafing the Soviet infantry and driving of the late arriving Yak-9.


BF109 flys over mounting Soviet disaster
You will find more photos and descriptions of this action on my flickr site at
http://www.flickr.com/photos/bill26048/sets/72157629477311262/

This weeks game was a 28mm Winter War scenario that Colin devised using the Triumph and Tragedy Rules.

Soviet troops parade before action - Za Stalina!!!
Colin and I commanded a Soviet force advancing over windswept snowy terrain towards the distant Finnish village of Talvisota.  We had the more numerous troops - 6 large units of Red army Infantry supported by a BT7 tank.  Sadly I had to dice for the quality of the troops and 5 of Soviet units were raw!  The Finns had one less unit and all their units were smaller.   Importantly they were far higher quality than the Soviets, they had 2 MGs and they were hidden in the trees in the flanks or in the village.

Urrah Tovarischii - the advance begins.....
The Soviet infantry made  2 advance moves and then came bogged down in a firefight with the ambushing Finns.  The raw infantry were repeatedly pinned by MG fire and steadily  broken apart.  The raw BT7 heroically tried to save the day but ended as a bullet riddled wreck, 2 crew eliminated, motor hit, track damaged, turret jammed, main gun knocked out.  The last lucky crewman surrendered.  With all 4 raw units fleeing the field the day was certainly the Finns.  Once again MGs and superior troops showed their superiority over masses of raw conscripts.

Finns observe the dark Soviet masses....
Bart has written up both of these games on his English/Polish language blog
http://asienieboje.blogspot.co.uk/